
Nowadays all major domain registrars offer managed DNS service along with the domain name(s) you register with them. You can use them to create most of the commonly used DNS records like A, MX, CNAME and some even allow you to create AAAA(IPv6), SRV and TXT records. But if you want full control over the DNS of your domain(s) its better to setup your own server for DNS hosting.
Setting up a full fledged authoritative DNS server is not so difficult as it sounds. If your know how DNS works you can easily setup your own DNS hosting server to host an unlimited number of domains. In this article I’ve setup an authoritative DNS server using Windows Server 2008 R2.
Requirements:
- Static public IP address
- Static private IP assigned to the server (if your server is behind a NAT device)
- A very reliable Internet connection with 100% uptime (not required if you’re just testing)
- Server with a capacity to handle DNS requests running Windows Server 2008
- A registered domain name, if you’re just doing a test setup register a free dot.tk domain name.
Check for Static IP address
The IP address assigned to your server (either private or public) must be static else you’ll get the following warning message when installing the “DNS server” role.

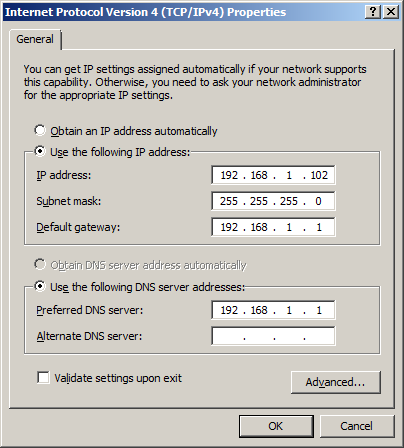
The Preferred and Alternate DNS settings can be anything but NOT the loopback IP address (127.0.0.1) because we’re setting up an authoritative only DNS server and not a recursive one. In the following screenshot I’ve set it to the IP address of my gateway device as it functions as a DNS forwarder also. Since my test server is behind a NAT device I’m using private IP addresses.
You may wonder how queries for the authoritative domain we’re configuring will be answered, I’ll provide an explanation at the end.
Install the DNS server role
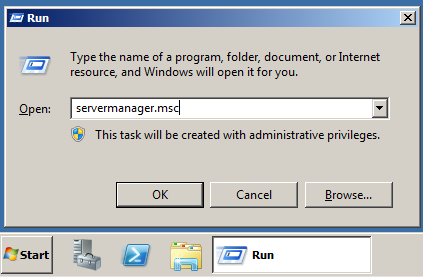
Hit [windows] + R to open the Run dialog box and enter “servermanager.msc”
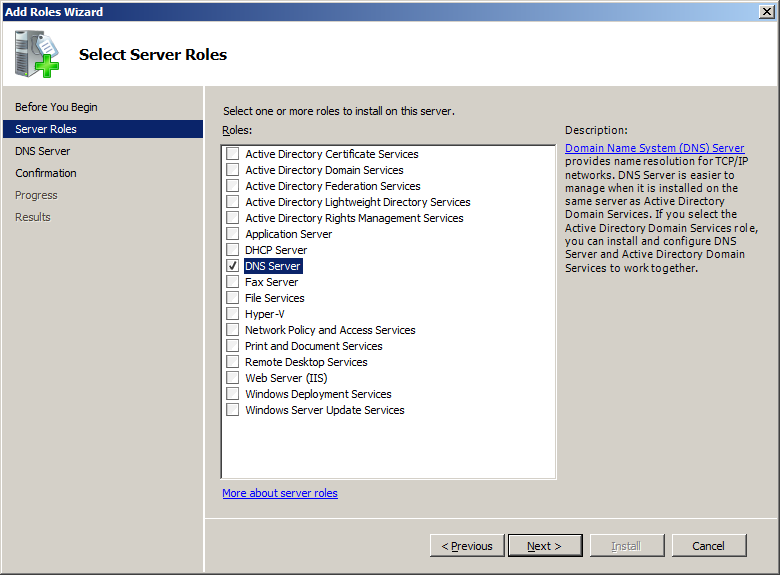
Click “Add roles“, in the wizard that appears click next and choose “DNS Server“.
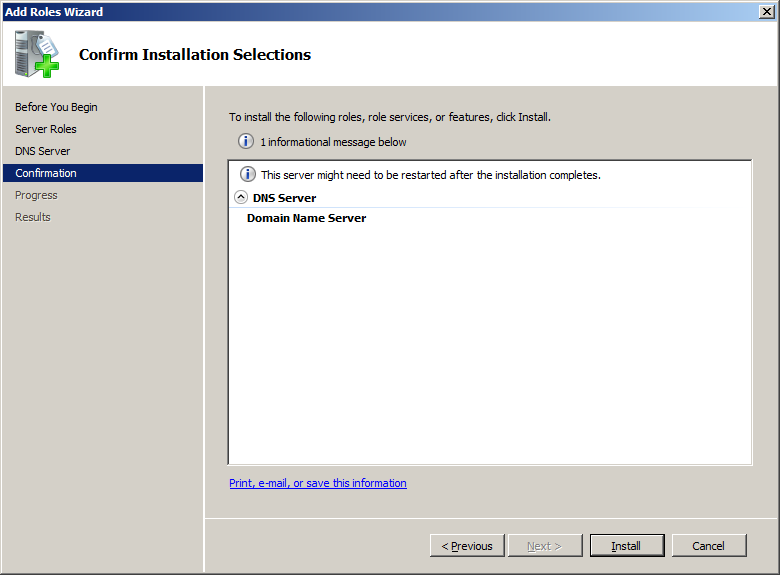
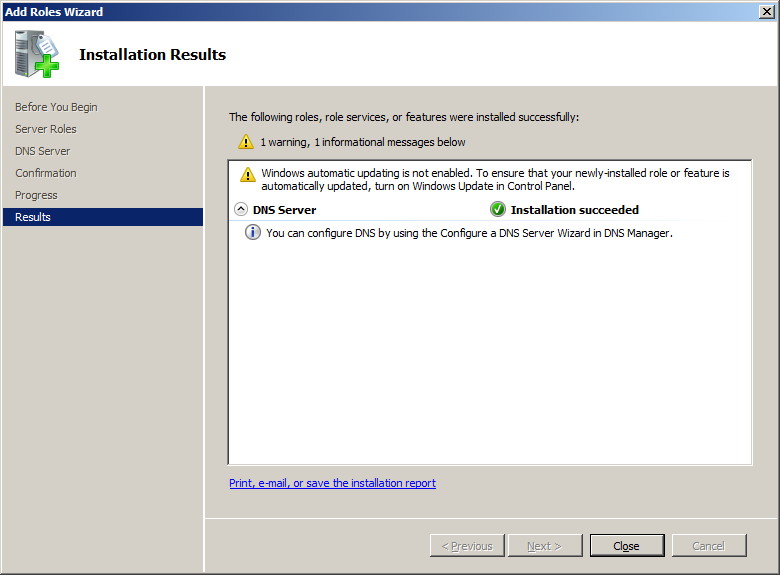
Click “Install” in the confirmation page.
After installation choose to restart your computer.
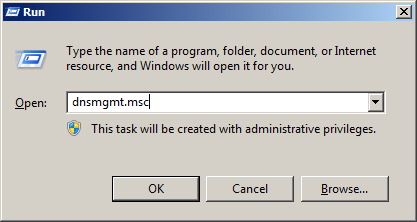
Once complete you can open the DNS manager in one of the following ways, open the “Run” dialog box and enter “dnsmgmt.msc”
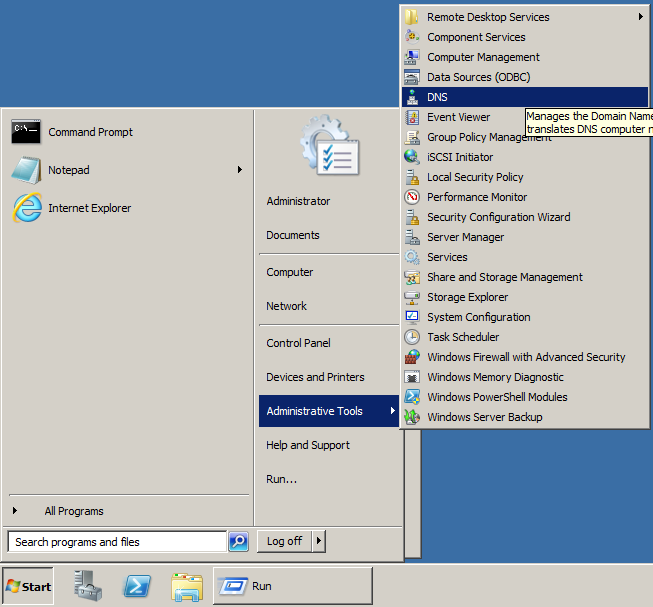
or Open Start menu > Administrative tools > DNS
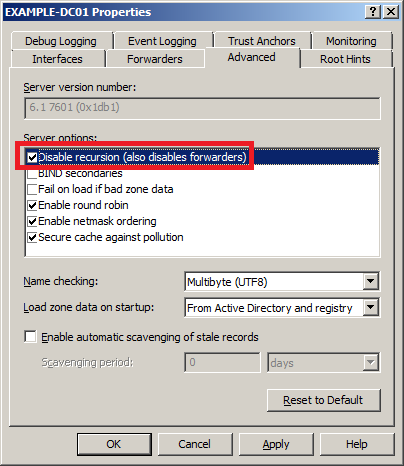
Disabling recursion and root hints
As I mentioned earlier we’re configuring an authoritative server so leaving recursion to its default (which is enabled) will create a vulnerability for DNS DoS attacks. Open the DNS Manager, right-click the name of your server and click properties.
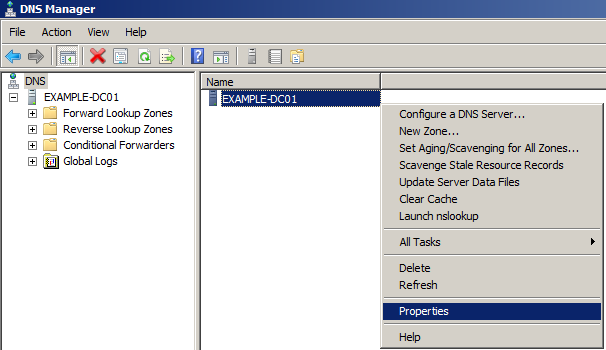
Go to the Advanced tab and check “Disable recursion (also disables forwarders)” and click OK.
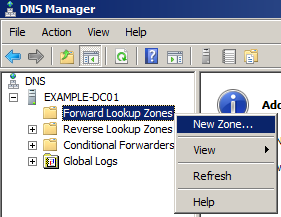
But it isn’t done yet, the server still has root DNS servers in its configuration so it returns the root DNS server details each time it is queried for a non existent domain name. To prevent this we need to create a forward lookup zone with the name “.” you read that right it is just a single dot. Right-click “Forward Lookup Zones” and select “New Zone“.
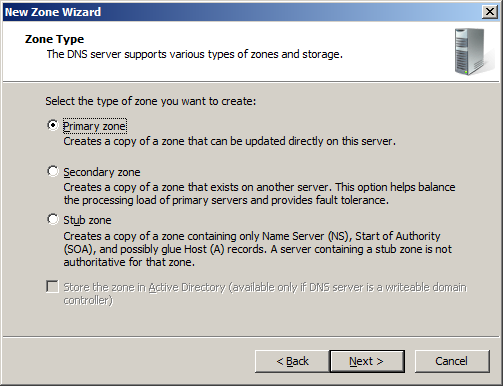
Proceed with the wizard and choose “Primary Zone” type.
Enter the zone name as “.” (without quotes) and click next.

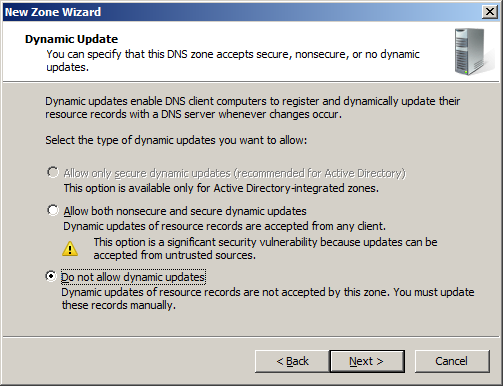
In the “Dynamic updates” page leave it to the defaults and press Next.
Finally click “Finish”

Now a root zone has been created so this server will return a NXDOMAIN (non existing domain) answer whenever a recursive query is made.
Creating an authoritative zone
This is similar to the steps followed previously, right-click the “Forward lookup zone“, click “New Zone”
Choose “primary zone”
Now enter your registered domain name, for the purpose of this article I’ll be using a free dot.tk domain name.
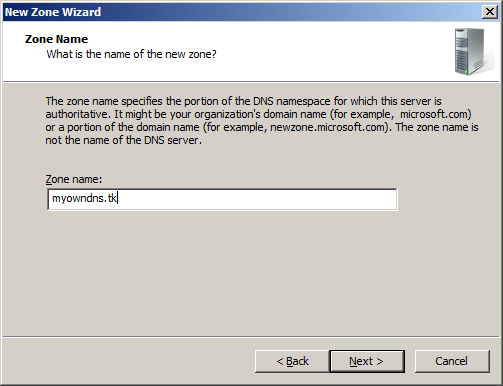
Leave “dynamic updates” to its defaults and finish the wizard.
In the next few steps we’ll be creating records for this zone, this is where steps for users with NAT and public IP differ.
Creating DNS records
While creating records for the domain always remember to use only public IP addresses. First we’ll be editing the NS and SOA records that were automatically created with this zone. Open the properties of the NS record and edit the name server entry in it.
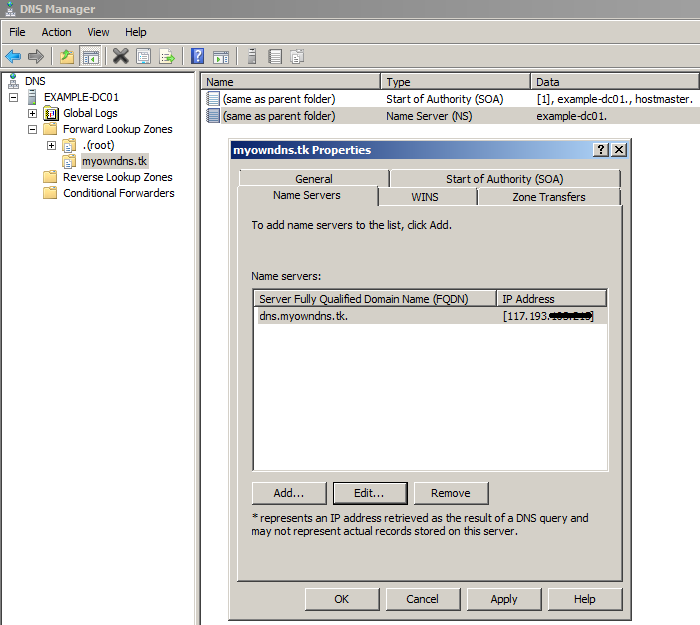
If your server has a directly assigned public IP then editing the FQDN alone if enough, set it to something like dns1.yourdomain.com. For servers behind a NAT device edit the FQDN as well as the IP address. Remove the private IP address in the list and enter your public internet facing IP address. When you save this setting you’ll be asked whether you want to remove the private IP address, press “Yes”
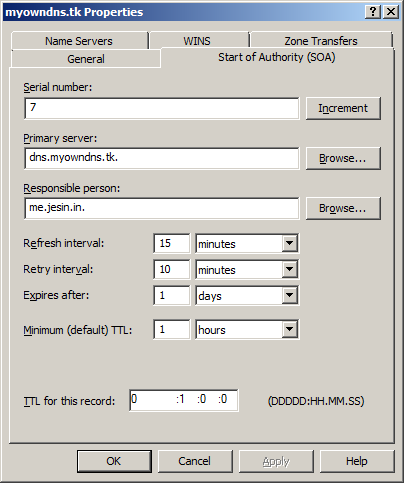
At this point DNS manager will automatically create an A record pointing “dns1.yourdomain.com” to <Public IP address>. Next modify the SOA record, change the Primary server to the NS record just edited and enter your email address under “Responsible Person” replacing @ with a dot (user@example.com is entered as user.example.com).
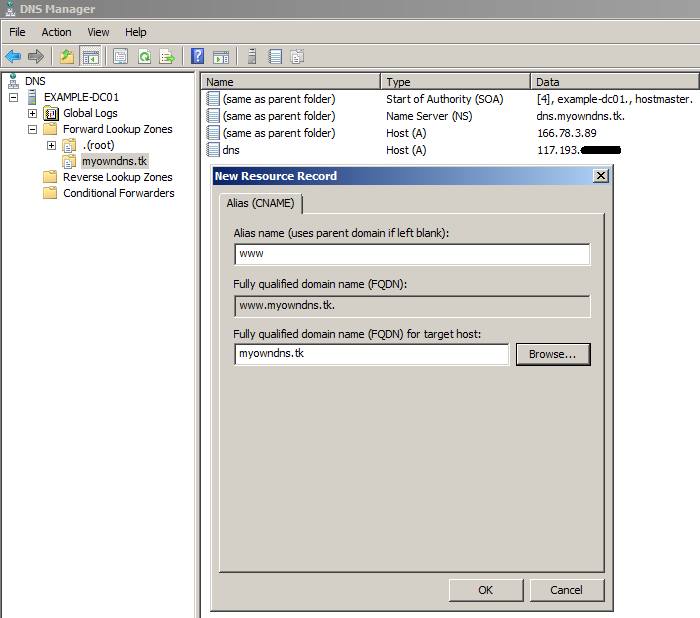
Create an A record for the parent domain name.

I’ve entered the IP address of the web server hosting this blog. Create a CNAME record for the www part of the domain name.
After everything is done make sure your firewall allows inbound port 53 both TCP and UDP, test this be going to the Open port checker

Login to your domain registrar’s control panel and configure name servers. You may also create additional records like MX and TXT if required.
Configure the domain name
Finally the domain name’s name server must be set to the IP address of the server we’ve just configured. Login to your domain registrar’s control panel and create a child name server. A child name server also known as a glue record looks like a subdomain of the major domain but is the authoritative name server for it. For example, the domain myowndns.tk will have a child name server dns.myowndns.tk along with the IP address of the server we’re setting up.

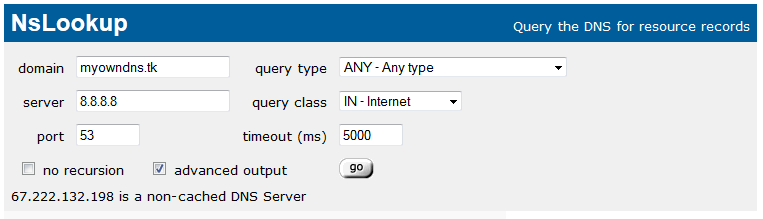
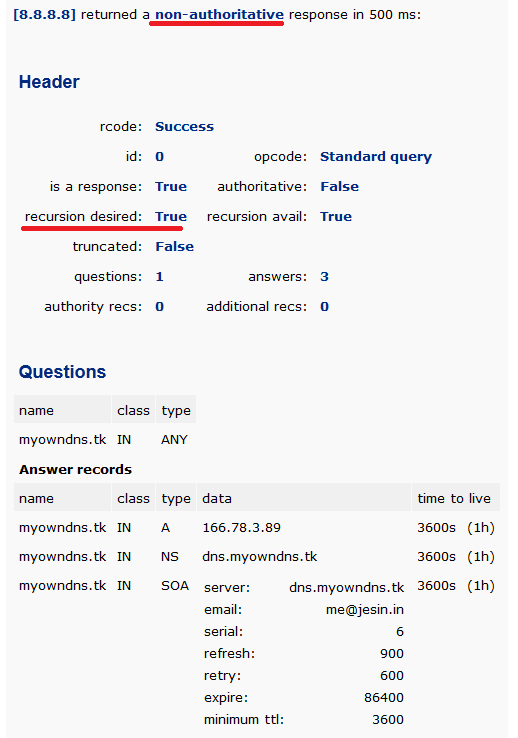
The IP address must be the public IP address through which the DNS server is accessible and query-able (port 53 allowed). Once this is done wait for “DNS propagation” to occur, theoretically it may take more than a day for propagation around the world but you can see the results in 10 minutes. Open an online DNS lookup tool which gives a lot of detail like network-tools.com. First query the default DNS server and have a look at the results.
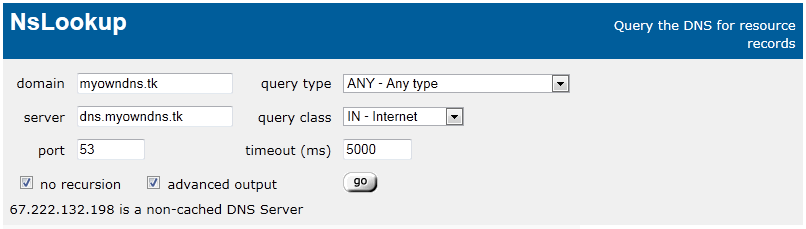
Then query the authoritative DNS server directly and look at the results.

To check if DNS has propagated throughout the world do a DNS lookup at whatsmydns.net
You can also setup secondary (or slave/backup) DNS servers the same way or get them free as mentioned in this article.
Any doubts or problems drop a comment below and I’ll help you out.


Very helpful explanation. thanks !!!.
Actually I too have to implement own hosted Public DNS server. So now my question is that if implementation has been done as per your documentation then how DNS name resolution will work.
I mean to say, if someone surfing any of hosted web server from internet then query will be forwarded to my local dns server where all pubilc IP entries are available then it will provide client PUBLIC IP address back after that it will again reach our domain for that particular web server ?
Hope you are able to understand my concern !!
Thanks in advance.
Hi,
Also please help me know which option should be choose..
1. Give direct public IP to local DNS Server
or
2. Should be NATTed
Thanks
I know it’s been a while since you’ve published this article, but just wanted to compliment you on this very well-presented and informative article. It is a bit rare to find this level of clarity, especially with the screenshot as examples. Thank you for this. I have noted your article on a stack exchange serverfault question (#583898) with full credit to you so others may be able to more easily find your excellent article.