VMware player is a boon for people who have a single computer but want to learn networking from the comfort of their couch. In this article I’ll brief about the components of the VMware network which will help you in designing your own virtual network.
Virtual Network Adapters
On the host machine (physical PC) where VMware player is installed two network adapters are created VMware Virtual Ethernet Adapter for VMNet1 (used for Host-Only networking) and VMware Virtual Ethernet Adapter for VMNet8 (used for NAT).
On virtual machines the network adapter is named as VMware accelerated AMD PCNet adapter.
Now you know where to look out for changing IP addresses.
Virtual DHCP Servers
By default there are two virtual DHCP servers doing the work of assigning IP addresses to machines on the virtual network.
The default configuration is as follows
Start IP address: 192.168.59.128
End IP address: 192.168.59.254
Subnet IP: 192.168.59.0
Subnet Mask: 255.255.255.0
Default Lease Time: 30 minutes
Max Lease Time: 2 Hours
Start IP address: 192.168.141.128
End IP address: 192.168.141.254
Subnet IP: 192.168.141.0
Subnet Mask: 255.255.255.0
Default Lease Time: 30 minutes
Max Lease Time: 2 Hours
Virtual Network Switches
VMware player if installed on windows has 10 virtual switches whereas when installed in Linux, has a mind blowing 255 switches. But by default only three of the following switches are used
VMnet0 – Bridged
VMnet1 – Host-only
VMnet8 – NAT
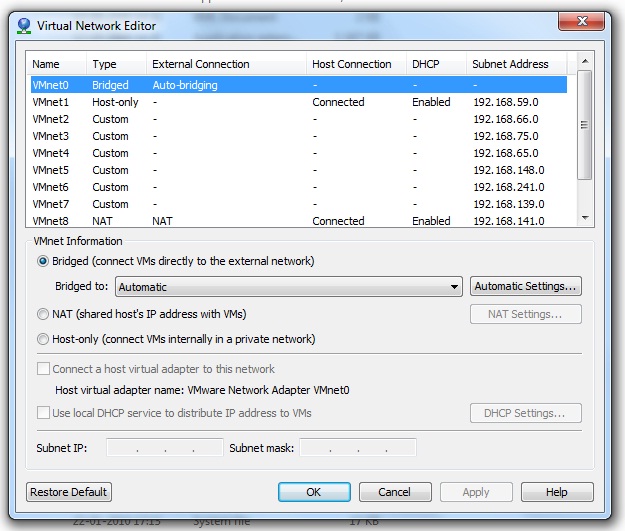
The rest are named as VMnet2, VMnet3 and so on. They are reserved for custom usage and can be used through vmnetcfg.exe about which I’ll be talking next.
The infamous vmnetcfg.exe
The vmnetcfg.exe is a very important file which comes handy for configuring custom settings for virtual DHCP servers and for adding more switches. However you can’t find this file with the default installation of VMware player so you need to copy this file manually using the following steps.
- Install VMware player to a location in the hard disk e.g.
C:\Program Files\VMware Player. - Open the setup file VMware-player-3.0.1-xxxx.exe againand wait for setup to load.
- Now keeping the installation wizard open navigate to your temporary files location which is usually
C:\Windows\Temp. - Locate a file named network.cab and extract it.
- Inside you’ll find the precious vmnetcfg.exe (you’ll discover why its precious later).
- Copy the file vmnetcfg.exe into your VMware player installation location in our case it is
C:\Program Files\VMware Player.
Open the file and you’ll see a program similar to this


Fantastic, just what I needed to turn off their DHCP so I can use my own. Maybe now I can get rid of the extra adapters too 🙂 Thanks!
Update for VMWare Player 5.0.2:
The UI comes already along with the player.
go to the vmware-directory and run in elevated cmd.exe-box
rundll32.exe vmnetui.dll VMNetUI_ShowStandalone