Jesin's Blog

Welcome to the Portal of Technology

  • Facebook
  • GitHub
  • RSS
  • Twitter
  • Home
  • Categories
    • Domains
    • Linux
    • Networking
    • PHP
    • Virtualization
    • Web Design
    • Web Servers
    • Windows
  • WordPress Plugins
    • Custom Error Pages
    • HTTP Digest Authentication
    • Mailgun Email Validator
  • Toolbox
    • DNS Lookup Tool
    • htdigest Generator Tool Online
    • htpasswd Generator Tool Online
    • HTTP Headers Lookup Tool
    • MD5 Encryption Tool
    • Open Port Check Tool
    • SHA-1 Encryption Tool
    • URL Encoding/Decoding Tool
  • About Me
  • Contact Me
  • Sitemap
Home ›
Virtualization ›
Using VMware Network Editor (vmnetcfg.exe)

Using VMware Network Editor (vmnetcfg.exe)

August 17, 2010 Virtualization Jesin A 2 Comments

virtualization category thumbnail

The vmware virtual network editor can be of immense help for experts who want to tweak each and every component in their virtual network. Unfortunately it won’t get installed on your system when you install VMware player but fortunately copying it manually is not so difficult. The article Components of VMware Network contains instructions on copying vmnetcfg.exe.

Customizing DHCP Settings

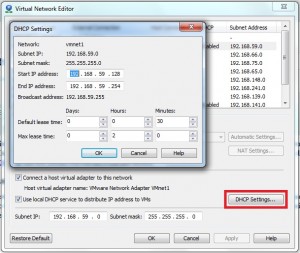
Using vmnetcfg tool you can customize the default DHCP scope i.e. the range of IP addresses that will be assigned to the virtual machines in that network. The lease time can also be extended as per requirements. To customize DHCP settings open vmnetcfg.exe select your desired virtual network and click DHCP settings.
vmware customize dhcp settings
Customize your Virtual Network's DHCP settings

Configuring Virtual Bridging

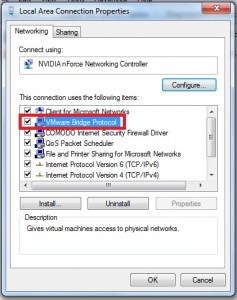
Using the bridging configuration you can make your Virtual Machine act as a separate computer on the network having its own identity on the network. To establish a network bridge with the required host network adapter of your choice, you must ensure that the “VMware Bridge Protocol” is enabled for that network adapter.
vmware bridge protocol
VMware bridge protocol must be enabled for bridging to work with a host network adpater

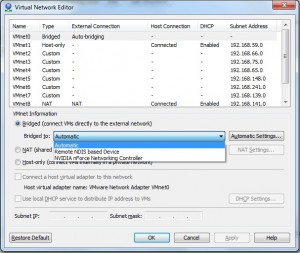
Open vmnetcfg.exe select VMnet0. This is the default virtual switch which uses bridging network configuration. From the drop down box below select the host adapter to which you want VMnet0 to be bridged. If your desired adapter isn’t appearing in the list it is because “vmware bridge protocol” is disabled for that adapter.
vmnetcfg bridged to option
Select the host adapter to which vmnet0 should be bridged

Configuring Port Forwarding

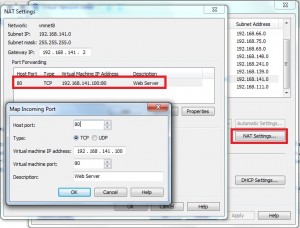
The default virtual switch for NAT (Network Address Translation) is VMnet8. After a fresh installation of VMware player only the DHCP of VMnet8 is configured, we need to configure port forwarding for NAT to work. For this select VMnet8 click NAT settings button. Go to Add and enter the host port number for which you will get the request, the virtual machine’s IP address and port number to which this connection will be forwarded. Enter a description for better understandability.
vmnetcfg nat settings
Enter the port number which receives requests and IP address to which the request should be forwarded

In the screen above assuming that my host computer‘s IP address is 192.168.0.1 and it receives a request on port 80, (commonly used for web servers) the request is forwarded to the virtual machine with IP address 192.168.141.100 on port 80. Note that the host port and Virtual machine’s port needn’t be the same. In a situation where you’re running your web server on port 8080 (or any other port) you can forward 192.168.0.1 on port 80 (host) to 192.168.141.100 on port 8080 (Virtual Machine).
Related posts:

virtualization category thumbnailComponents of VMware Network virtualization category thumbnailAdding Custom Network Adapter in VMware Player virtualization category thumbnailVMware Bridged Networking virtualization category thumbnailServices of VMware player virtualization category thumbnailDownload vmnetcfg.exe

Tags: vmnetcfg, vmware

Comments

  1. Moroni says

    March 30, 2011 at 4:26 am

    Thanks!

    Reply

Trackbacks

  1. VMWare Interfaces Tutorial | RedNectar's Blog says:
    July 20, 2011 at 4:17 pm

    […] are more advanced options as well, and some of them are covered here. But from me, that’s the end of this […]

    Reply

Leave a Reply Cancel reply

Your email address will not be published. Required fields are marked *

Get a wealth of information delivered to your inbox. Subscribe and never miss a single article.

  • Tutorials and howtos
  • Code, scripts and commands
  • Online Tools

* No spam, unsubscribe anytime

Hire Me

  • SSL installation and hardening (A+ on Qualys SSL test)
  • Apache & Nginx configuration
  • Email deliverability improvement (10/10 on Mail Tester & MailGenius)
  • WordPress customization, optimization and migration
  • and much more…

    Tools

    • DNS Lookup Tool
    • htdigest Generator Tool Online
    • htpasswd Generator Tool Online
    • HTTP Headers Lookup Tool
    • MD5 Encryption Tool
    • Open Port Check Tool
    • SHA-1 Encryption Tool
    • URL Encoding/Decoding Tool

    Nav

    • Home
    • About Me
    • Contact Me
    • Privacy Policy
    • Sitemap
    Vultr SSD VPS

    Creative Commons License
    Jesin's Blog by Jesin A is licensed under a Creative Commons Attribution-NonCommercial-ShareAlike 4.0 International License.
    Based on a work at websistent.com.