VMware player is the only way to learn networking for those who cannot afford to buy more that one computer. You can try out advanced configurations using many virtual machines, different OSes and network topologies and all this for free using VMware player. But folks who’ve used or seen the paid VMware Workstation version will feel that they are missing out something in terms of configuring network adapters. VMware Player offers three types of networking configurations vmnet0, vmnet1, vmnet8. Read Components of VMware Network for more information about Virtual Switches and DHCP servers. Even with VMware Player it is possible to add and edit custom virtual network adapters albeit with a few geeky editing of files. But its easy to do it as long as you understand what you’re doing.
Step 1:- Add a custom network adapter using vmnetcfg.exe
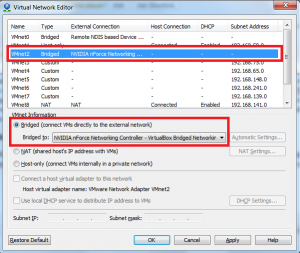
The file vmnetcfg.exe is the VMware Network Editor if you can’t find it or don’t know how to use it read the article Using VMware Network Editor (vmnetcfg.exe). Open the vmnetcfg.exe file and configure a Network Adapter. For this article I’ll select vmnet2 and set the type as bridged.

Click ok and proceed to the next step.
Step 2:- Edit the virtual machine’s configuration file
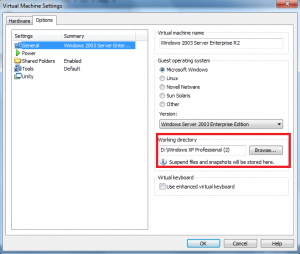
Behind each virtual machine you see is a configuration file with a .vmx extension. This file contains all the configuration of that Virtual Machine and any change made through the GUI are stored there. First you should locate that file for the VM to which you wish to add the custom adapter. For this open the VMware player select the required Virtual Machine click edit go to the options tab and take note of the working directory. Also take note of the number of network adapters that virtual machine contains.

Navigate to that directory and open the file with a .vmx extension (VMware virtual machine configuration file) using a text editor. Now go to the end of the file and add the following lines. Before you do that take note of the last ethernetX value where X is a number if you have three network adapters for that machine you’ll have ethernet3. For this example I assume this is the first network adpter you’ll be adding to this Virtual Machine so I’ll set it to ethernet0.
ethernet0.present = "TRUE"

ethernet0.virtualDev = "vmxnet"

ethernet0.startConnected = "TRUE"

ethernet0.connectionType = "custom"

ethernet0.vnet = "vmnet2"
Don’t forget to replace ethernet3 with your corresponding number for that adapter. Lets dive in and look what is what. The startConnected is the “Connect at power on” option shown at the GUI. It can also be set to FALSE. Leave the connection type as it is and move on to vnet value, it should be set to the custom adapter’s name which was configured in the first step, in this example “vmnet2”. Save the file.
Step 3:- Test whether the network adapter has been added
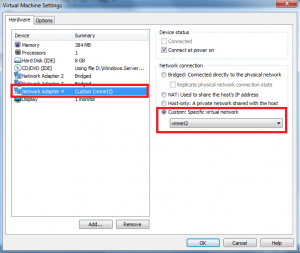
Open VMware player select that virtual machine whose file you edited and a new network adapter will be displayed.

Start the virtual machine and you can start using this Virtual Machine. So you’ve successfully created a custom network adapter for you’re virtual machine.

thank you so much.i have found the solution for a long time.now i find it here.you work is perfect.