This is my first post this year and the first tutorial using jQuery. In this tutorial we’ll see how to add or remove text input fields in a HTML form using jQuery and process the submitted data using PHP. The biggest advantage of jQuery lies in its simplicity of selecting elements. Plain JavaScript would require numerous getElementBy… methods and sifting through indexes to select the right element whereas jQuery does it with just a simple $('.class1 .class2 element') similar to CSS thanks to Sizzlejs.
HTML Form
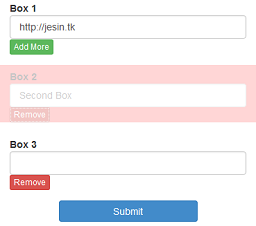
I’ll be using a very basic HTML form with only one statically coded input box with a “Add Box” link.
<div class="my-form">
	<form role="form" method="post">
		<p class="text-box">
			<label for="box1">Box <span class="box-number">1</span></label>
			<input type="text" name="boxes[]" value="" id="box1" />
			<a class="add-box" href="#">Add More</a>
		</p>
		<p><input type="submit" value="Submit" /></p>
	</form>
</div>
Enter jQuery
Make sure jQuery is loaded either by hosting it yourself or using one of the several jQuery CDNs available. For this article I used the unminified latest version hosted by code.jquery.com
<script type="text/javascript" src="//code.jquery.com/jquery-latest.js"></script>
Code for the “Add Box” link.
<script type="text/javascript">
jQuery(document).ready(function($){
	$('.my-form .add-box').click(function(){
		var n = $('.text-box').length + 1;
		var box_html = $('<p class="text-box"><label for="box' + n + '">Box <span class="box-number">' + n + '</span></label> <input type="text" name="boxes[]" value="" id="box' + n + '" /> <a href="#" class="remove-box">Remove</a></p>');
		box_html.hide();
		$('.my-form p.text-box:last').after(box_html);
		box_html.fadeIn('slow');
		return false;
	});
});
</script>
The variable n we’re using here is for numbering the text box labels sequentially. Then we select the “:last” <p> tag with class “text-box” and insert the HTML “.after()” it with a fadeIn effect. The return false statement is required so that the anchor tag (the “Add Box” link) doesn’t navigate.
Code for the “Remove” link.
$('.my-form').on('click', '.remove-box', function(){
	$(this).parent().css( 'background-color', '#FF6C6C' );
	$(this).parent().fadeOut("slow", function() {
		$(this).remove();
		$('.box-number').each(function(index){
			$(this).text( index + 1 );
		});
	});
	return false;
});
Using the click() event handler doesn’t work as this link was added dynamically so we use the on() method. Next we fadeOut and remove the “parent” element of the remove button which is the <p> tag containing the entire input box. In the function attached with fadeOut we have used the each() method to reassign the label numbers.
You can also spice up things by adding a background-color when a text box fades out.
PHP Form handling
Did you notice square brackets in the name attributes of all boxes. When the form is POSTed all the values entered in these dynamically created boxes are passed as an array. So in our case the following PHP variable would hold the data entered in these text boxes in the form of an array.
$_POST['boxes'];
So how would you save this array in the database? The serialize() function saves the day, this function returns a string containing a byte-stream representation of this array. The serialized version of the above array would look like this.
a:3:{i:0;s:14:"Value in Box 1";i:1;s:7:"Value 2";i:2;s:11:"Box 3 Value";}
This can be inserted or updated in the database like this.
$serialized_boxes = serialize( $_POST['boxes'] );
mysql_query( "INSERT INTO `table_name`(column_name) VALUES ('" . mysql_real_escape_string( $serialized_boxes ) . "')" );
If you are new to connecting PHP and MySQL read this article.
Retrieving and Displaying saved data
Unless AJAX is used we have to utilize PHP to print the text boxes and their values. The foreach statement comes in handy. Since the data was serialized and stored it must be unserialized back to the form of an array.
<form role="form" method="post">
	<?php
	$data='a:3:{i:0;s:14:"Value in Box 1";i:1;s:7:"Value 2";i:2;s:11:"Box 3 Value";}';
	if( !empty( $data ) )
	{
		foreach( unserialize($data) as $key => $value ) :
	?>
			<p class="text-box">
				<label for="box<?php echo $key + 1; ?>">Box <span class="box-number"><?php echo $key + 1; ?></span></label>
				<input type="textl" name="boxes[]" id="box<?php echo $key + 1; ?>" value="<?php echo $value; ?>" />
				<?php echo ( 0 == $key ? '<a href="#" class="add-box">Add More</a>' : '<a href="#" class="remove-box">Remove</a>' ); ?>
			</p>
	<?php
		endforeach;
	}
	else
	{
	?>
		<p class="text-box">
			<label for="box1">Box <span class="box-number">1</span></label>
			<input type="text" name="boxes[]" value="" id="box1" />
			<a class="add-box" href="#">Add More</a>
		</p>
	<?php
	}
	?>
	<p><input type="submit" value="Submit" /></p>
</form>
This code uses a predefined serialized value, when implementing this you should retrieve the serialized value from the database and place it in the $data variable. To print the “Add Box” link only for the first box a ternary operator (line 10) is used.
Limiting the number of Textboxes
You surely wouldn’t want users to an add unlimited number of text boxes. The following condition in the “Add Box” link’s click event we display a message after the 5th text box.
$('.my-form .add-box').click(function(){
	var n = $('.text-box').length + 1;
	if( 5 < n ) {
		alert('Stop it!');
		return false;
	}
	var box_html = $('<p class="text-box"><label for="box' + n + '">Box <span class="box-number">' + n + '</span></label> <input type="text" name="boxes[]" value="" id="box' + n + '" /> <a href="#" class="remove-box">Remove</a></p>');
	box_html.hide();
	$('.my-form p.text-box:last').after(box_html);
	box_html.fadeIn('slow');
	return false;
});
A client side validation is never enough, so we’ll add a check on the PHP code too.
if( 5 < count( $_POST['boxes'] ) )
{
	echo 'Your error message here';
	exit;
}
This demo uses the bootstrap framework.
Complete Code
This is the complete code sans PHP.
<!DOCTYPE html>
<html>
<head>
<title>Add or Remove text boxes with jQuery</title>
<script type="text/javascript" src="//code.jquery.com/jquery-latest.js"></script>
<style type="text/css">
<!--
#main {
	max-width: 800px;
	margin: 0 auto;
}
-->
</style>
</head>
<body>
<div id="main">
	<h1>Add or Remove text boxes with jQuery</h1>
	<div class="my-form">
		<form role="form" method="post">
			<p class="text-box">
				<label for="box1">Box <span class="box-number">1</span></label>
				<input type="text" name="boxes[]" value="" id="box1" />
				<a class="add-box" href="#">Add More</a>
			</p>
			<p><input type="submit" value="Submit" /></p>
		</form>
	</div>
</div>
<script type="text/javascript">
jQuery(document).ready(function($){
	$('.my-form .add-box').click(function(){
		var n = $('.text-box').length + 1;
		if( 5 < n ) {
			alert('Stop it!');
			return false;
		}
		var box_html = $('<p class="text-box"><label for="box' + n + '">Box <span class="box-number">' + n + '</span></label> <input type="text" name="boxes[]" value="" id="box' + n + '" /> <a href="#" class="remove-box">Remove</a></p>');
		box_html.hide();
		$('.my-form p.text-box:last').after(box_html);
		box_html.fadeIn('slow');
		return false;
	});
	$('.my-form').on('click', '.remove-box', function(){
		$(this).parent().css( 'background-color', '#FF6C6C' );
		$(this).parent().fadeOut("slow", function() {
			$(this).remove();
			$('.box-number').each(function(index){
				$(this).text( index + 1 );
			});
		});
		return false;
	});
});
</script>
</body>
</html>
Any doubts or problems drop a comment!


This is great and just what I have been looking for although I’m a little unclear where to place the php within this script. Can you give an example at all?
Julian
Julian are you referring to PHP which saves the data or the PHP which prints multiple text boxes containing saved data?
The code to save POSTed data is placed on the page to which the form is submitted to (
Thanks for your reply. Your instructions are very clear and I think I need to learn more about dealing with arrays. My confusion lay in the actual php needed to post the data from the forms into mysql database. Are new database columns created for each new box that I create with your jquery script? Any further reading you can suggest would be greatly appreciated.
Julian
No. The values from all the text boxes are “serialized” into a single line of string which is stored inside one database cell.
This article might be helpful – http://www.tuxradar.com/practicalphp/5/11/0
I used your codes but I’m having trouble on inserting it into my database , there is an error found undefined index:urls
That was an error I made when copy pasting code tested locally. The line containing the SQL query should have the
$serialized_boxesinstead of$urlsvariable.mysql_query( "INSERT INTO `table_name`(column_name) VALUES ('" . mysql_real_escape_string( $serialized_boxes ) . "')" );I’ve changed it in the article too.
How to store each value in new database rows for each new box?Please help me.
Hi,
I have a stackoverflow question related to your code. If you have a moment your input would be really appreciated.
Link: http://stackoverflow.com/questions/23651881/remove-parent-array-at-source-saving-options-to-wordpress
Thanks
Elliot
Hi,
What if I want to dynamically add/remove fields with the (s) filled with values from the database? like using a select tag with option tag values form the database.
hello, is there any possibility to add an entire fieldset ? (hope there is)
This is great. I figured my previous php questions that I left here back in March but I do still have one question. I’m having a little difficulty retrieving the serialized value from the database. Can you enlighten me at all? Many thanks.
Nice script. Thanks for sharing.
Mashed it with some code of my own. Biggest flaw in your script is not being able to delete the first box. It can easily be fixed by .append instead of .after. So you can create boxes even when there are no boxes to begin with.
What is the easiest way to get the values after I send it to another file?
The
$_POST['boxes']variable will have values for all the boxes in an array format. The other file should use this variable and loop through it to extract values.foreach( $_POST['boxes'] as $box ) { //On each loop $box will contain the value of each box }I done this.. Very Simple form
$(document).ready(function(){

	$('#addButton').click(function(){
		var count=$('#count').val();
		count=parseInt(count)+1;
		$('#image').append('Image #'+count+' : ');
		$('#count').val(count)
	});
});
function removetag(a){
	var iid=a;
	iid=iid.replace("remove-","image-");
	$('#'+iid).remove();
}
Image #1 :
<?php $con = mysql_connect("localhost", "root", "") or die('Error'); $db = mysql_select_db("login", $con)or die('Error'); if(!empty($_POST['count'])){ $count=$_POST['count']; for($i=1;$i<=$count;$i++){ $at = time(); if(!empty($_POST['img-'.$i])) $qry = "INSERT into sample(image, at)VALUES('{$_POST['img-'.$i]}', '$at')"; $new = $_POST['img-'.$i]; var_dump($new); if (!mysql_query($qry)) { // Error handling echo mysql_error(); } } }It works awesome! Thanks for the post! *greetingsFromIndonesia* 😀
I want to auto-populate data in textboxes from database. How to do this?
Hi
I am unable to fetch the all textbox’s array values in a string variable. Only first value is fetched. Can you please help me in this.
Regards
Komal Rohilla
Please share your code via Pastebin. Only the code that fetches the values.
hi jesin,
i have 2 textfield area, one textfield contains default constant value and another contain editable textbox so once in enter the value i just wanted to genrate a link like this below,
if you have any idea please let me know.
Hi Jamal,
Try this http://jsfiddle.net/jesin/s94gw7k9/
hi jesin,
thanx for your reply, http://jsfiddle.net/jesin/s94gw7k9/ this example have problem, like when i provide my name as “JAMAL” , the dynamic link just creating a link with the name “JAMA/id=abc”, but i have solve this problem with the below solution
you have to call both keypress function as well as keyup simultaneously to avoid this problem.
Replace
keypresswithkeyupand it should work as expected.How to add three textboxes using one add button?
I want to generate three textboxes at once using a single add button. Tried many times but did not get any output. Please help.
Thanks in advance 🙂
Place the code for the adding text boxes inside a
forloop:<script type="text/javascript"> jQuery(document).ready(function($){ $('.my-form .add-box').click(function(){ for ( var i = 0; i < 3; i++ ) { var n = $('.text-box').length + 1; var box_html = $('<p class="text-box"><label for="box' + n + '">Box <span class="box-number">' + n + '</span></label> <input type="text" name="boxes[]" value="" id="box' + n + '" /> <a href="#" class="remove-box">Remove</a></p>'); box_html.hide(); $('.my-form p.text-box:last').after(box_html); box_html.fadeIn('slow'); } return false; }); }); </script>Great thanks a lot! 🙂
Excellent…
Thank you for the code.
how can you save the values in the database? thank you. 🙂
Thank You So Much Bro, This is really helpful….
Hi Jesin i’ve used your code. can i ask
what”s inside the file and file.php
$code = htmlentities( file_get_contents( __FILE__ ) );
one thing more sir.
is it working when it use in mutiple forms?
thanks, i hope you could help
sorry for that reps sir. i’ve already check and its not work on multiple forms
Hello sir. Kindly show the code for the file.php or the file thanks in adv.
I really need help now
Hi Kevin,
The demo prints the entire code of itself.
The code
$code = htmlentities( file_get_contents( __FILE__ ) );reads the current file contents to the variable named$code.Are you looking for a specific piece of code?
Thanks for the response sir,.
just want to know sir if i can use multiple forms. for each data inputs.
Thank you.
Thank you so much!!! I was trying to access the auto added textfields and set their values using javascript and it was a nighmare. You need a PHD in javascript to successfully pull it off, but this jquery approach is beautiful. Thank you again.
Hello sir Jesin
how about if the inputs are numbers. how to compute for the total using javascript?
Thank in advance/ >
I have two simultaneous text boxes namely author and email address like
These are stored in database like a:2:{i:0;s:3:”abc”;i:1;s:13:”abc@gmail.com”;}
Now, I have search.php file which searches from the database. How can I search for author name in the database ? Please help.
On click of ‘add more’, I need to get additional controls like ‘another text box + drop down’ (binded for the respective text boxes)
ie ) by default, one text box and one drop down,
On click of add more, i need to get textbox and drop down together.
Could you please suggest
Where to give the $_POST[‘boxes’]; and serialize()
are we giving mysql_query( “INSERT INTO `table’… in if( isset($_POST[‘boxes’]) && is_array($_POST[‘boxes’]) ) ??
Hello Jesin. First of all thank you for such a great script, it has been extremely helpful. I was wondering if it would be possible for you to provide a tutorial where you show how to add/delete floating placeholders to your existing code. I came across this very nice script from stack overflow that dynamically generates floating placeholders on inputs. I tried combining it with your add/delete script but I have not been successful, I have not been able to make the placeholder float on the dynamically generated input text fields, it only works on the static portion of your form. I’m obviously a newbie with jQuery. I have copied below the actual jQuery script and CSS for your reference. I think this would be very useful if could be combined with your add/delete dynamic rows script, since it would allow for less code to be written when generating the dynamic textboxes, given that fact that there would be no need hard code in labels, since it would automatically use the placeholder as a label. Hope to hear from you soon, once again thank you so much for such a great script. Kind Regards, Joel
$("input").each(function(e) {
  $(this).wrap('');
  var tag = $(this).attr("placeholder");
  //var tag= $(this).data("tag");
  $(this).attr("placeholder", "");
  $(this).after('' + tag + '');
});

$('input').on('blur', function() {
  if (!$(this).val() == "") {
    $(this).next().addClass('stay');
  } else {
    $(this).next().removeClass('stay');
  }
});
CSS:
* {
  box-sizing: border-box;
}
body {
  background: #eee;
}
form {
  background: #fff;
  padding: 2em;
  width: 30em;
  margin: 5em auto;
  border-radius: 4px;
  box-shadow: 0 1px 2px rgba(0, 0, 0, .25);
}
fieldset {
  border: none;
  position: relative;
  font-family: arial, sans-serif;
}
input {
  width: 20em;
  padding: 1em 1em .8em 1em;
  width: 100%;
  font-size: 1.2em;
  border: 1px solid #aaa;
  box-shadow: inset 0 1px 3px rgba(0, 0, 0, .15);
  border-radius: 2px;
}
input:focus {
  outline: none;
  background: #fbfbe9;
}
input + label {
  display: block;
  cursor: text;
  color: #777;
  transition: .15s ease-out all;
  position: absolute;
  top: 1.8em;
  left: 2.3em;
}
input:focus + label,
label.stay {
  top: 1em;
  left: 3em;
  font-size: .7em;
  font-weight: bold;
  color: #139dd7;
  transition: .15s ease-out all;
}
https://stackoverflow.com/questions/28682092/floating-placeholder