
The ancient serial port which is no longer found on the latest motherboards and even the not so latest laptops is still used for connecting to the console of networking devices, headless computers and a lot other applications. On computers which do not have built-in serial ports USB-to-Serial adapters can be used. Linux identifies inbuilt serial ports as /dev/ttyS0, /dev/ttyS1,….. /dev/ttySn and USB-to-Serial adapters as /dev/ttyUSB0, …. /dev/ttyUSBn and they can be accessed using terminal emulator applications like PuTTY, minicom and screen.
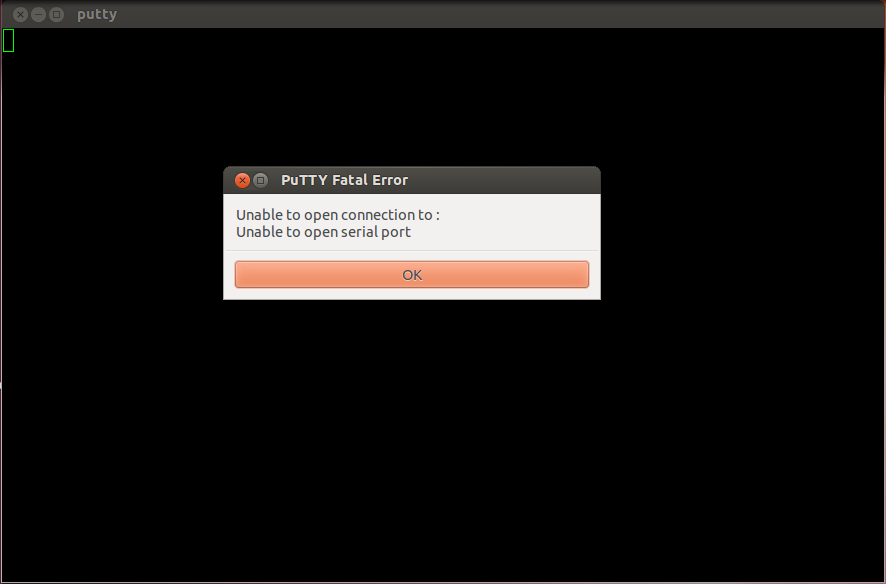
Normally when the serial console is accessed using the terminal emulator of your choice as a non-root user you’ll get a “permission denied” error. Using PuTTY on Ubuntu I got the following error – “Unable to open connection to: Unable to open serial port“.
This is because the device file of the serial port does not have permissions to allow to currently logged in user to “read” or “write” to the serial device. The following command will confirm that.
jesin@localhost:~$ ls -l /dev/ttyUSB*
crw-rw---- 1 root dialout 188, 0 Apr  8 21:54 /dev/ttyUSB0
crw-rw---- 1 root dialout 188, 1 Apr  8 21:54 /dev/ttyUSB1
So we can see that only the “root” user and the “dialout” group have proper permissions, while chmod can be used to grant access to the required user or everyone it is messy and not a secure way. The easier way is the add the user to the dialout group.
First verify if the user does belong to the dialout group using the “id” command.
jesin@localhost:~$ id -Gn jesin
jesin adm cdrom sudo dip plugdev lpadmin sambashare kvm
Next add the user to the “dialout” supplementary group.
jesin@localhost:~$ sudo usermod -a -G dialout <username>
Example:
jesin@localhost:~$ sudo usermod -a -G dialout jesin
You have to logout and login before changes take effect. After logging back in try the “id” command again.
jesin@localhost:~$ id -Gn jesin
jesin adm dialout cdrom sudo dip plugdev lpadmin sambashare kvm
Now all your terminal emulator applications will work with the serial port without any issues.


Hi there! Thank you for your EXCELLENT aids. Simple and VERY informative. I’ve managed my serial port to work with my vinyl cutter thanks to this! 🙂 Have a nice day!
Thanks for the tip. I tried it how ever and even though I added dialout where I didn’t have it, it still didn’t fix my problem. I am still getting the “Unable to connect to:” and “Unable to connect to serial port.”
Hi Dave,
If you didn’t have the dialout group there is no use of adding it.
You should check the group ownership of the serial port with any of these commands.
And then add your user to that group.
Hey thanks for the quick reply. I found out what was wrong about an hour after I wrote you. It occurred to me to check the BIOS and when I did saw that the serial port was “Disabled”. I enabled it and everything worked. I was able to access my Cisco routers and switches. Only to find out that one of the routers I bought for my lab is not responding to the reset command. Oh well. 8)
how did you check the BIOS? Can you provide step by step instructions. I am having the same problem i.e. logging into cisco routers.Thanks alot
Hi Jesin,
I have a bluetooth sensor device,(which connects to com* port in windows), it is connected to /dev/rfcomm* in linux. I am able to see some data coming if I did sudo cat /dev/rfcomm*. Also, I am able to view the data on /dev/ttyS* if I did sudo ln -s /dev/rfcomm0 /dev/ttyS99 and sudo cat /dev/ttyS*.
However, I am unable to open the file through serial emmulator like putty, and hence(apparantly) I am unable to open the file in my MATLAB code(which is my final aim).
It would be helpful if you could suggest a solution.
Thankyou,
vamsi.
Hello Vamsi,
I haven’t tried this before but I think entering the following command will solve your problem.
Replace 0 with the number in /dev/rfcomm* and keep this terminal running.
More info at http://stackoverflow.com/questions/15464475/how-to-setup-serial-communication-in-processing-to-dev-rfcomm0#answer-15586323
Hi Vamsi,
As i read your question, i can see even I am facing the same issue.
I have a bluetooth sensor connected to windows and data is passed to serial port COM23. I have java code which reads this serial port and echo data on screen.
I am trying to run same java code on ubunut 14.04 but its not working as it does not find COM23 there which is obvious.
So rather than changing much into code , I am trying to find way
1. Directly read bluetooth data on ubuntu and write it to some file which will be then read from java code.
2. Pass bluetooth data to serial port as i did it on windows and then read serial port. Write serial port data to some file and then read that file through java code.
I have tried below commands
hcidump
sudo rfcomm connect 0
also tried to create sym link between bluetooth and serial port but none is helping much.
Can you please help me here?
hi Jesin
I need to burn my .hexfile in to 89v51rd2 microcontroller. I am using UBUNTU 12.0. please let me know how to connect or map the USB to port. I have to use USB to serial converter.
Hi Asokan,
First identify your USB to serial adapter
Then use a terminal software like CuteCom. This thread might be useful – http://askubuntu.com/questions/360179/sending-hex-with-cutecom
Hi Jesin
Thank you so much .
Thank you !!
My problem was solved
Thanks dude!
Thank you sir, you made my day!
It worked great!
hi i am useing minicom for USB to serial converter for HC05 bluetooth module
when i type Hello it displays some garbage value in minicom
so i requst plz send me some suggestions
Hi Jesin..just a note to say I got my serial port going again..running Ubuntu and after an update last night it vanished…I run a ham radio program called Xastir and it uses a serial port for TNC communications to the radio world….I’ve only been running Linux for 3 weeks…..didn’t want to return to windows….thanks for your blog where I found I had lost permissions for dialout somehow….it had been working for 3 weeks without a glitch……Gene in Canada (Florida for the winter)
Nice one. This is exactly what i needed.
Cheers
S,
Thank you so much,
after waisting 72 hours searching the internet I found this, which solved everything!
Richard
(Windows7, virtual box running Debian, RS232 and FTDI USB to Serial Converter)
Thank you so very much. It’s so hard to find simple language along with examples in solving these types of problems. I am very grateful!
Thank you very much sir 🙂
Thanks. Exactly what I needed.
Good comments , I learned a lot from the specifics . Does anyone know where my assistant would be able to get access to a blank a form document to fill in ?
You saved my morning (and a lot of my time). Thank you for this!
Thank you… you save my life <3
Hi Jesin,
I’m new to Ubuntu / Linux Distro. I’m trying to install Reliance 3 data card to work through GUI mode. I was able to install it able to install it and can see it listed under Internet folder. While I try to launch it says “Cannot Access Serial Port. Make Sure you have appropriate permission”. Followed your thread and added myself to the dialout group and relogged, still same. Please help.
Many thanks. Works great!
Thanks worked well for me using xubantu on an old Eeepc to get cleanflight running.
Hi Jesin,
Many thanks for taking time and trouble to put this info onto the Web. It was exactly what I needed to allow me to upload a program from Linux Mint to an Arduino Nano board. Keep up the excellent work!! Greetings from Australia,
Jim.
Hi Jesin. Fist of all thank you so much for providing this tutorial/script. It has been extremely useful. I came across another jQuery script that dynamically creates floating placers on text fields. I tried combining your “add/delete dynamic rows” script with the placeholder script, but have not been successful in making them work together properly. The floating placeholder effect only works on the static text fields of the form, and not on the dynamically generated text fields. I have not found the proper way to bind the onclick event from the placeholder script with your “add/delete” script. I was hoping that this might interest you in perhaps sharing another tutorial where dynamically generated text fields contain floating placeholders. It’s nice because it would allow for less code to be written when creating the dynamic form, the script automatically uses the placeholder to float above the input as a label. I found the script in Stackoverflow, and have copied it below for your reference. I hope that at some you could develop a tutorial where you show these two scripts combined. Once again, thank you for such a great script. I hope to hear from you soon. Kind Regards, Joel.
Jquery Placeholder script:
$("input").each(function(e) {
  $(this).wrap('');
  var tag = $(this).attr("placeholder");
  //var tag= $(this).data("tag");
  $(this).attr("placeholder", "");
  $(this).after('' + tag + '');
});

$('input').on('blur', function() {
  if (!$(this).val() == "") {
    $(this).next().addClass('stay');
  } else {
    $(this).next().removeClass('stay');
  }
});
CSS:
* {
  box-sizing: border-box;
}
body {
  background: #eee;
}
form {
  background: #fff;
  padding: 2em;
  width: 30em;
  margin: 5em auto;
  border-radius: 4px;
  box-shadow: 0 1px 2px rgba(0, 0, 0, .25);
}
fieldset {
  border: none;
  position: relative;
  font-family: arial, sans-serif;
}
input {
  width: 20em;
  padding: 1em 1em .8em 1em;
  width: 100%;
  font-size: 1.2em;
  border: 1px solid #aaa;
  box-shadow: inset 0 1px 3px rgba(0, 0, 0, .15);
  border-radius: 2px;
}
input:focus {
  outline: none;
  background: #fbfbe9;
}
input + label {
  display: block;
  cursor: text;
  color: #777;
  transition: .15s ease-out all;
  position: absolute;
  top: 1.8em;
  left: 2.3em;
}
input:focus + label,
label.stay {
  top: 1em;
  left: 3em;
  font-size: .7em;
  font-weight: bold;
  color: #139dd7;
  transition: .15s ease-out all;
}
https://stackoverflow.com/questions/28682092/floating-placeholder