Blogger.com provided by Google is very good free blogging tool using which any newbie can setup their blog within a few minutes without knowing a single line of code. By default when you create a blog with blogger.com you’ll be provided with a subdomain name that looks like http://example.blogspot.com When you share this URL with your friends it might be difficult to remember because of the blogspot.com suffix. But you can use your own domain with Blogger service and you can easily buy your own domain because they are so cheap nowadays or if you don’t want to spend money register a free .tk domain. Using a custom domain with blogger requires you to edit the domain’s DNS settings and a couple of Blogger settings which I’ll be telling you how.
Step 1:- Register a domain name
All those who have already registered a domain can skip this step. Others, you need to register a domain name from a domain registrar there are numerous available like godaddy.com name.com domainmonster.com to name a few. All of them charge a registration fee which varies according to the domain extension (.com, .net, .info) you choose after that you’ll have to pay the renewal fee each year. If you don’t want to pay for a domain head to dot.tk and register a free domain name.
Step 2:- Create DNS records for the domain
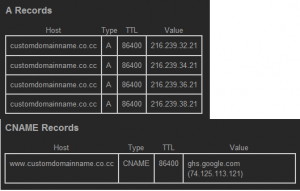
So your have a brand new domain with you, you have to tell it to point to Blogger’s servers for this you’ll have to edit its DNS records. Login to your domain registrar’s control panel. Select the option to “Manage DNS” this option varies from control panel to control panel if you’re having a hard time finding it ask your registrar. Now you have to create four A records i.e. set your domain to point to four IP addresses. Select the option to create an A record and enter the following IP addresses in the value field one by one for each record. So you’ll have totally four A records
216.239.32.21
216.239.34.21
216.239.36.21
216.239.38.21
Either leave the host field empty or enter your domain name without “www” i.e. example.com as for the TTL field leave it as it is or enter 86400 or 1 Day. Now your domain example.com will point to Blogger.com but what about www.example.com. For this a CNAME or Canonical name record is required. Select the option to create a CNAME record and enter www or www.example.com in the Host field and ghs.google.com in the value field. Again you can set the TTL to 86400 or 1 Day. Finally to find out if the changes have been applied go to the DNS lookup tool and enter your domain name first without www and then with www. You should see results similar to the screenshot below.

Step 3:- Change the setting for your Blog
Login to your Blogger account from the dashboard under a blog go to “settings” select the “Publishing” subtab click “custom domain” near switch to. Now you’ll have an option to register a domain here since you already have a domain click “Switch to Advanced Settings” and enter your domain name with the “www” prefix (www.example.com) fill out the captcha below and click save settings. You can choose if you want to redirect example.com to www.example.com for this tick the option “Redirect example.com to www.example.com” which appears under your domain name.

Now fire up the browser and type your new domain name and you should see your blog. If you don’t see it immediately don’t fret it might take a few more hours for changes to happen. So now you have your own domain for blogger.


I have a problem with blurred, broken thumbnail images in the featured, recent post, popular post sections after successfully adding a domain name. If I use a blogspot domain name, everything is ok, but when I add a domain name, it happens. Can you help me fix it? Thanks.
I’ll have a look, please share the blog’s URL here or via the contact form.