Earlier I had written an article on custom error pages for Apache but doing the same with WordPress is not that straightforward. WordPress has the ability to handle 404s internally but doing the same for other 4xx errors requires modifying the code.
I’ve been searching how to do this for months without luck. Recently after I created my own theme for this blog I got some knowledge of WordPress internals.
I put that to use and after several hours of experimenting built the 403 and 401 custom error pages for my WordPress blog.
Step 1: Create a child theme
Creating a child theme will ensure that changes aren’t overwritten after the main theme is updated. If you’re creating a custom 403 page from your own WordPress theme you can skip this step.
To create a child theme
- Create a directory inside /document/root/wp-content/themes/ and name it <yourtheme>-child. So if you are doing this on Customizr theme create customizr-child.
- Inside /document/root/wp-content/themes/customizr-child create a file called style.css with the following contents
/*
Theme Name: Customizr Child
Template: customizr
*/
@import url('../customizr/style.css');
While the Theme Name: can be anything the Template: field must match the directory name of the main theme.
- Login to the admin panel, go to Appearance > Themes and enable “Customizr Child” or whatever you entered for Theme Name.
Step 2: Create or Copy a 403.php file
Copy the 404.php file from the main theme to the child theme
cp wp-content/themes/customizr/404.php wp-content/themes/customizr-child/403.php
People with their own theme can create a copy inside the same directory
cp wp-content/themes/your-theme/404.php wp-content/themes/your-theme/403.php
For a custom 401 error page, name the file 401.php. If your theme doesn’t have a 404.php file read this on how to create one.
Step 3: Edit the functions.php file
Again people with their own themes edit your wp-content/themes/your-theme/functions.php file.
Those who created a child theme should create a wp-content/themes/customizr-child/functions.php file and place the following PHP code inside.
function custom_error_pages()
{
    global $wp_query;

    if(isset($_REQUEST['status']) && $_REQUEST['status'] == 403)
    {
        $wp_query->is_404 = FALSE;
        $wp_query->is_page = TRUE;
        $wp_query->is_singular = TRUE;
        $wp_query->is_single = FALSE;
        $wp_query->is_home = FALSE;
        $wp_query->is_archive = FALSE;
        $wp_query->is_category = FALSE;
        add_filter('wp_title','custom_error_title',65000,2);
        add_filter('body_class','custom_error_class');
        status_header(403);
        get_template_part('403');
        exit;
    }

    if(isset($_REQUEST['status']) && $_REQUEST['status'] == 401)
    {
        $wp_query->is_404 = FALSE;
        $wp_query->is_page = TRUE;
        $wp_query->is_singular = TRUE;
        $wp_query->is_single = FALSE;
        $wp_query->is_home = FALSE;
        $wp_query->is_archive = FALSE;
        $wp_query->is_category = FALSE;
        add_filter('wp_title','custom_error_title',65000,2);
        add_filter('body_class','custom_error_class');
        status_header(401);
        get_template_part('401');
        exit;
    }
}

function custom_error_title($title='',$sep='')
{
    if(isset($_REQUEST['status']) && $_REQUEST['status'] == 403)
        return "Forbidden ".$sep." ".get_bloginfo('name');

    if(isset($_REQUEST['status']) && $_REQUEST['status'] == 401)
        return "Unauthorized ".$sep." ".get_bloginfo('name');
}

function custom_error_class($classes)
{
    if(isset($_REQUEST['status']) && $_REQUEST['status'] == 403)
    {
        $classes[]="error403";
        return $classes;
    }

    if(isset($_REQUEST['status']) && $_REQUEST['status'] == 401)
    {
        $classes[]="error401";
        return $classes;
    }
}

add_action('wp','custom_error_pages');
I’ve highlighted the lines which can be customized according to your liking. This will be displayed in between the <title> </title> tags.
Save the functions.php file and test it by adding a ?status query string like
http://www.example.com/?status=403
http://www.example.com/?status=401
This should display a page similar to a 404 page. Do this test BEFORE customizing the 403.php or 401.php file and proceed only if this succeeds because
To error is human
When editing the 401.php or 403.php file if you commit a mistake doing this test will show the infamous WordPress white-screen-of-death. Troubleshooting it can become confusing which is why you should test before editing them.
The explanation of this code is give at the end.
Step 4: Customize the 401.php or 403.php file
Once you find that things work after editing the functions.php file go ahead and customize to your heart’s content.
Each theme differs so I cannot give very specific instructions on this. Since we are using the Customizr theme for this example I’ll share the code for it.
<?php do_action( '__before_main_wrapper' ); ##hook of the header with get_header ?>
<?php tc__f('rec' , __FILE__ , __FUNCTION__ ); ?>
<div id="main-wrapper" class="container">
<div class="container" role="main">
<div class="row">
<?php do_action( '__before_article_container'); ?>
<div class="<?php echo tc__f( '__screen_layout' , tc__f ( '__ID' ) , 'class' ) ?> article-container">
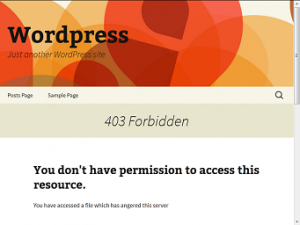
<header><h1 class="entry-title">403 Forbidden</h1></header>
<div class="entry-content"><p>Access to this area is forbidden. Please go to the home page.</p></div>
</div><!--.article-container -->
<?php do_action( '__after_article_container'); ?>
</div><!--.row -->
</div><!-- .container role: main -->
<?php do_action( '__after_main_container' ); ?>
</div><!--#main-wrapper"-->
<?php do_action( '__after_main_wrapper' ); ?>
The modified lines are highlighted.
Normally a 404.php page contains some static text and a get_search_form() function. Remove the function and replace the text with your own words.
Step 5: Set the Error Document on your web server
I’ve used only Apache and Nginx so I’ll provide steps for them. For the documentation for other web servers.
Apache
Edit the .htaccess file or your vhosts file and add the ErrorDocument directive as appropriate.
ErrorDocument 403 /index.php?status=403
ErrorDocument 401 /index.php?status=401
If you’re hosting WordPress inside a directory you should add that too like
ErrorDocument 403 /blog/index.php?status=403
Nginx
Edit the nginx virtual host configuration file of WordPress inside /etc/nginx/sites-enabled and use the error_page directive
error_page 403 = /index.php?status=403
error_page 401 = /index.php?status=401
Do a config test
service nginx configtest
and reload
service nginx reload
Now test it by accessing something that is forbidden.
I have Directory Listing disabled in my web server so if I access /wp-includes/ it displays my WordPress custom 403 page.
Similarly I have password protected the wp-login.php file so accessing it will show my WordPress custom 401 page.
Digging into the code
Now for the working of this code you added to the functions.php file.
I’ll start explaining the last line first because this is how execution starts.
add_action('wp','custom_error_pages');
The add_action() hooks a function into a specific action. So here we are hooking the user defined function custom_error_pages() to the action wp.
Many people recommend hooking into the template_redirect action as that is when WordPress decides which template to load. But for this purpose I find it a little too late as the headers are already sent.
Then why not use an action much earlier? I tried that too but it was a bit too earlier as the WP Query object wasn’t set. So the wp action seems just right.
Let’s move to our function custom_error_pages()
global $wp_query;
This is to make the global object $wp_query available inside our function.
if(isset($_REQUEST['status']) && $_REQUEST['status'] == 403)
The condition which checks if the URL contains the query string ?status=403. But why have two conditions – isset() and the comparison operator isn’t the second one enough?
Yes it is enough but checking that way shows a PHP notice that index “status” is undefined. Even though it isn’t shown onscreen on define(‘WP_DEBUG’,false) environments it is better to have it. Now going inside the condition.
$wp_query->is_404 = FALSE;
$wp_query->is_page = TRUE;
$wp_query->is_singular = TRUE;
$wp_query->is_single = FALSE;
$wp_query->is_home = FALSE;
$wp_query->is_archive = FALSE;
$wp_query->is_category = FALSE;
In this chunk of code we are saying that the template displayed is for a singular page and not a post, home, archive or category. This is required in themes like Customizr which use only the index.php file for all types of templates. Setting these Boolean values will ensure that the page template design is displayed.
add_filter('wp_title','custom_error_title',65000,2);
The add_filter() function is used to replace the code of an existing function. In this case we are using our own function custom_error_title() to replace the title to be displayed in the browser’s title bar.
The 65000 here is the priority, lower ones are executed first. So why am I using such a high one here? Numerous WordPress SEO plugins use this filter to place custom titles. So using a high value ensures our code is the one that applies its function at the last thus replacing all changes. The fourth parameter 2 specifies the number of arguments required for function custom_error_title.
add_filter('body_class','custom_error_class');
Previously we modified the title, this filter is to modify the class attributes of <body>. By using our own function we are adding classes called “error403” and “error401” which can be used to provide a special CSS styling to this page if needed.
status_header(403);
This function sends a 403 Forbidden header (or 401 unauthorized). Without this a 200 OK will be sent which is highly inappropriate.
get_template_part('403');
This is were we include the 403.php file into the scene. Finally we stop WordPress from doing anything further.
exit;
Hope you got this working, do leave a comment on how helpful this was or if you have problem getting this work.


Thank you very much for the tutorial. I think this is something that WordPress should implement natively, as 403 and 401 errors aren’t completely unheard of. In the meanwhile, this is a very nice fix!
Thanks a lot for such a nice and clean attempt, and for the plugin too. Will help a lot of people out there for sure. All the very best.
Wow so nice of you to post the
1) plugin option
2) coding option
Very complete and helpful tutorial – I’m all set with custom 404, 401, and 403 pages that I can manage without a plugin for now – and WITH a plugin in the future.
Great post.
Super helpful. Thanks so much for this tutorial and also the amazing plugin!
It seem this code doesn’t work because wordpress never set 403 code (always 404) so htaccess rules never match…
Any Idea for a working code to do same think ?