Anything uploaded to the document root (www, htdocs, public_html folder) of your web server is visible to the public that is why its always recommended to store confidential information outside the document root. But if you want that information to be accessed by selected people then you need to put it in a directory inside the document root and password protect it. Even thought server side languages like PHP and ASP can be used to handle authentication it can be cumbersome. So the htaccess and htpasswd can be used to simplify the whole process and make your life easier. Lets go step-by-step
Step 1:- Create a .htpasswd file
The .htpasswd file contains a list of user names and passwords for authentication. It is recommended to create this file outside the document root folder (www or htdocs or public_html folder). So lets assume my document r0ot is /home/username/public_html then the .htpasswd file should be placed inside /home/username folder. Make sure there is a dot at the beginning of the file name. Use the .htpasswd generator tool to create a username and encrypted password and place it inside the .htpasswd file. Place one entry per line. Look at the following scenario
User1
Username: Mike
Password: pass1
User2
Username: John
Password: pass2
User3
Username: Michel
Password:pass3
For the above list of credentials the following lines should be added to the .htpasswd file
Mike:$apr1$0tk/3shV$XxjMyZUr9NQf87HTm7I7R.

John:$apr1$tA.gPX3v$ahSj1zkt9ZeunGqVYxMNa0

Michel:$apr1$HV03itP8$okrHauKvukvMSyE3LHlOe0
Save the file and move on to the next step
Step 2:- Create a .htaccess file
Go inside the directory which is to be password protected. In this case lets take it as /home/username/public_html/secret. Create a file named .htaccess, open it using the text editor and add the following lines.
AuthType Basic
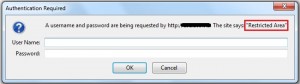
AuthName "Restricted Area"
AuthUserFile "/home/username/.htpasswd"
Require valid-user
The AuthName specified here will be displayed in the web browser dialog box when someone tries to access the password protected directory.

The AuthUserFile is the complete location of the .htpasswd file on the server. If you don’t know the complete location create a php file named location.php and type
<?php

echo $_SERVER['DOCUMENT_ROOT'];

?>
Access the file via url (http://example.com/location.php) and it will display the complete location of your files on that server.

Delete the location.php file, it might pose a security threat later. Now according to the above image if you placed the .htpasswd file outside the htdocs folder then the AuthUserFile location should be "C:/AMP/Apache Software Foundation/Apache2.2/.htpasswd".
The Require option is to grant/restrict access to particular users. If it is set to valid-user then all the users specified in the .htpasswd can login. If you want only Mike and John to be allowed the set it as Require user Mike John.
Save the .htaccess file and move on to the testing part.
Step 3:- Test the new settings
Access the password protected folder using your web browser web browser. You’ll see a dialog box asking you to enter the username and password. After you enter it you should be able to view the page. If it doesn’t accept the credentials entered and still prompts you for the username and password it could be due to the following reasons
- Username and/or password is incorrect. You may have mistyped the username/password and the case is incorrect.
- There is a syntax error in the .htpasswd file. Make sure only one username password combination is entered per line and the password should be encrypted for .htpasswd file.
- The location of htpasswd specified in the .htaccess file for AuthUserFile could be incorrect. You should specify the entire directory location.
When the web browser prompts you for credentials if you press cancel a 401 error is encountered and an “Authorization Required” error is displayed.
Note: Even though this method password protects your directories the password entered from your browser are sent to the server in an unencrypted form. Use this method only to add an extra layer of security for protecting administration panels and backends.


[…] or public_html folders). If you have no other option then store them in a separate directory and password protect […]