Are you tired of using an email address which is in someone else’s domain ? Does it add to your frustration when you want to signup for a particular name and you end up with lots of numbers and underscores in them ? How nice it would be if you could have your preferred user name followed by a personalized domain name suffix (after the ‘@’ symbol). Imagine how cool it would be to brag about this email ID among your friends with all generic names. Whats more, you can also allow your friends to create email addresses under your domain. The best thing is all this can be done free of cost from the comfort of your seat. Interested ? Read on…
Microsoft has a wonderful service named Windows Live Admin Center (formerly Windows Live Custom Domains) using which you can do wonders. Some of the coolest features of Windows Live Admin Center are
- Hotmail is used to manage emails for your domain so you
- Supports a whooping 500 user accounts and you can request more if required
- Allows users to signup for your domain using a feature named “Open Membership”
The requirements for using Windows Live Custom Domains are
- A domain name, can be a Top level domain or a subdomain either paid or free of cost like dot.tk
- Ability to edit the DNS settings for your domain either through the domain control panel or web hosting panel
- Some basic knowledge about domains and emails (optional)
Let me start explaining step-by-step
Step 1:- Get a domain name registered
If you already have a domain name (website name) registered skip this step. There are many domain registrars on the web, just google for “domain registrars” from them you can register domain names with a preferred extension like .com, .net, .info for an annual payment. But if you want a free domain you can register one at dot.tk it offers the capability to edit the DNS settings for your domain which is what we need. After registering a domain name move on to the next step.
Step 2:- Register at Windows Live Custom Domains
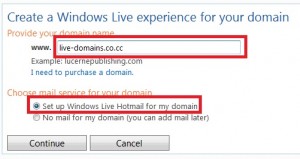
Visit http://domains.live.com under “Custom Domains” click get started, enter the domain name you registered without the www prefix and make sure the option “Windows Live Hotmail for my domain” is selected. Click continue

In the next step you need to select which Live ID (or username) you’ll be using to administer that domain, if you already have an account in hotmail or any other Windows Live services select the first option or if you’re a new user select the second option. For this tutorial I’ll assuse you’re a new user and select the second option.

Give all the details asked in the form and click “I accept”. After logging in you need to prove that you own the domain and all the emails for [users]@example.com should go to hotmail servers, we’ll be doing both in a single step.
Step 3:- Edit the DNS settings for your domain
After logging into Windows Live Custom Domains in the Domain settings page under Mail setup take note of the MX server value which you’ll have to enter in your domain DNS settings

Go to your domain registrar’s website (the website where you registered the domain) login to your domain control panel if you’ve registered with dot.tk select the option “use dot tk free DNS service” and click configure and select the type as MX enter the MX server value copied from Windows Live Custom Domains website

Click Next and your changes will be saved.
If you’ve registered a Top Level Domain somewhere else login to your domain control panel from their website and from their DNS service you can edit the MX records for your domain

TXT records This is an optional setting but if your domain control panel allows this record type then setting it will ensure no email service will accidentally make emails from your domain as junk. Set the Host to your domain name and value to v=spf1 include:hotmail.com ~all then save it.
Step 4:- Edit Custom Addresses for the domain
To login to your mail box you should visit http://hotmail.com but what if you want to access it by typing http://mail.example.com ? Go to the “custom addresses” option in your Windows Live Custom Domains Account click add enter “mail” and click OK

Login to your domain control panel and create a CNAME record, set the Host to “mail” and value to “go.domains.live.com” and save your configuration

Step 5:- Creating and testing email IDs
So finally lets test it form your Windows Live Custom Domains Account go to “Member Accounts” and add new accounts, login to the email account of some other provider like Gmail, Yahoo or Rediff send an email to [email]@yourdomain.com and check whether you receive it. Don’t fret if you that email didn’t reach you try after 24 Hours as it may take that much time for DNS settings to apply.
To allow users to create email ID using your domain on their own go to “Open Membership” and enable it. Then create a signup module and share it with your friends. You can also share just the link after enabling Open Membership the link is https://domains.live.com/members/signup.aspx?domain=example.com replace example.com with your domain name.


I have to say that for the past couple of hours i have been hooked by the impressive articles on this blog. Keep up the great work.
Hi,
THanks for the lovely tutorial. I have a question which is related to this tutorial and I hope you will be able to guide me in the right direction.
I have successfully configured my personal domain with windows live custom domains and can send/receive emails using outlook / hotmail.com. I would also like to configure my PHP script on my website to be able to send emails using the hotmail SMTP so the receiving domain does not treat my automated emails as spam. Could you please guide me in the right direction?
thanks,
Hi Tarry,
If you’re on shared hosting try the PHPMailer package.
https://github.com/PHPMailer/PHPMailer
On VPS/dedicated servers you can setup MSMTP to do this.
The SMTP settings you should use
Server address: smtp-mail.outlook.com
Port: 25 (or 587 if 25 is blocked)
Authentication: Yes
Encrypted Connection: TLS
User name: Your email address
Password: Your password
Thanks Admin !! Gr8 work
I have enabled ‘open membership’
Here is the URL (https://domains.live.com/members/signup.aspx?domain=sams-website.com)
I am facing an issue which is that i can’t enter the domain name after the ‘@’.
Any help would be greatly appreciated.
Thanks
– Sam