
Connecting GNS3 to the internet is just another step to bring your emulated network lab closer to real gear. There are many ways to do this based on what internet connection you are using. If you just have an ADSL modem/router connected to the ethernet port of your physical machine having a private IP address it is very simple to get your lab to the internet. But if you are using a WiFi connection/Data card/a device that requires you to assign a public IP on the physical interface getting your lab to access the internet requires a few more commands in Linux or a few more clicks in Windows. Apart from making configuration changes to your operating system NAT has to be configured on the emulated router that connects to the internet.
Connecting GNS3 to the Internet – Scenario 1
(Physical interface has a private IP address)
In this scenario your physical machine is connected to a modem/router using a RJ45 cable and the ethernet port of your computer has a private IP address assigned manually or via DHCP.
This is the simplest means of connecting GNS3 to the internet. Open GNS3 as an administrator (Windows) by right clicking it and selecting “Run as administrator” or as a root user (Linux) by using the sudo command.
jesin@ubuntu:~$ sudo gns3
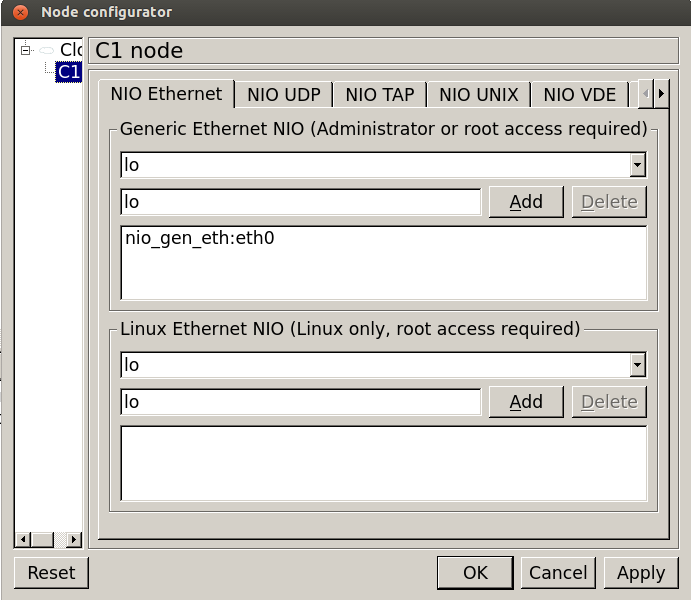
Place a cloud node in your topology, right-click select configure and from the drop down list under the ethernet tab select “Local Area Connection” on Windows or “eth0” on Linux and click OK.
Connect a router to this cloud using an ethernet link, open the console of the router and navigate to the interface which is connected to the cloud node.
R1>enable
R1#configure terminal
R1(config)#interface FastEthernet 0/0
Now if the modem/router connected to the physical computer has a built in DHCP server use the following command to configure the router port to recieve IP address via DHCP.
R1(config-if)#ip address dhcp
else assign the a static IP address
R1(config-if)#ip address 192.168.1.3 255.255.255.0
Bring this interface “up”
R1(config-if)#no shutdown
If you had choose the DHCP way of assigning IP address you will see the following line
*Mar 1 01:24:31.751: %DHCP-6-ADDRESS_ASSIGN: Interface FastEthernet0/0 assigned DHCP address 192.168.1.101, mask 255.255.255.0, hostname R1
If you assigned the IP address manually a default route has to be added to ensure internet connectivity.
R1(config)#ip route 0.0.0.0 0.0.0.0 192.168.1.1
Try pinging a public IP address such as 8.8.8.8, if you ping a domain name such as websistent.com you’ll receive an “Unrecognized host or address, or protocol not running” error as we have not yet configured DNS. That’s all, now scroll down to the last part of configuring NAT and DNS servers.
Connecting GNS3 to the Internet – Scenario 2
(WiFi or physical interface has a public IP address)
Your setup comes under this scenario if your physical machine uses WiFi to communicate with your modem or you are using a modem which assigns a public IP address directly to the physical interface of your computer.
In this case directly connecting the router to the physical computer’s ethernet port shown in the previous step does not make it work because the GNS3 router will also be needing a public IP address to communicate. In case the physical computer is using WiFi the problem will arise because a secured WLAN uses WPA/WEP hence the GNS3 router will fail to communicate with your WiFi router itself.
Linux
In Linux we will be creating a loopback (TAP) interface, connect the GNS3 router to it and configure NAT using IPTables to forward packets from the loopback interface to the physical network port of the computer. A package is needed which can be installed using the following commands.
In RHEL/CentOS variants:
yum install uml-utilities
In Debian/Ubuntu variants:
apt-get install uml-utilities
Once the package is installed run the following commands as root to create a loopback interface and assign an IP address to it.
tunctl -t tap0
ifconfig tap0 10.200.200.1 netmask 255.255.255.252 up
You can assign any IP address to the tap0 interface just make sure it does not overlap with any other interface. I have used a prefix length of /30 because only two IP addresses will be required – one that we assigned here to the tap0 interface and another which we will assign to the GNS3 router. Enter the following commands to create IPTables firewall rules to perform NAT and forward the packets from the interface specified after “-i” through the interface specified after “-o”.
iptables -t nat -A POSTROUTING -o wlan0 -j MASQUERADE
iptables -A FORWARD -i tap0 -j ACCEPT
Replace wlan0 with the interface on the physical computer which connects to the internet it could be ppp0 or br0 or something else. Ensure the IPTables rules persist, if you want to ensure the tap0 interface persists a reboot create a cron job to add it when Linux starts up.
crontab -e
add the following lines
@reboot /usr/sbin/tunctl -t tap0 && /sbin/ifconfig tap0 10.200.200.1 netmask 255.255.255.252 up
IPv4 forwarding has to be enabled at kernel level so use the following command.
echo 1 > /proc/sys/net/ipv4/ip_forward
If you execute the command above as a non root used you’ll get an error “bash: /proc/sys/net/ipv4/ip_forward: Permission denied” in that case use the following command.
echo 1 | sudo tee /proc/sys/net/ipv4/ip_forward
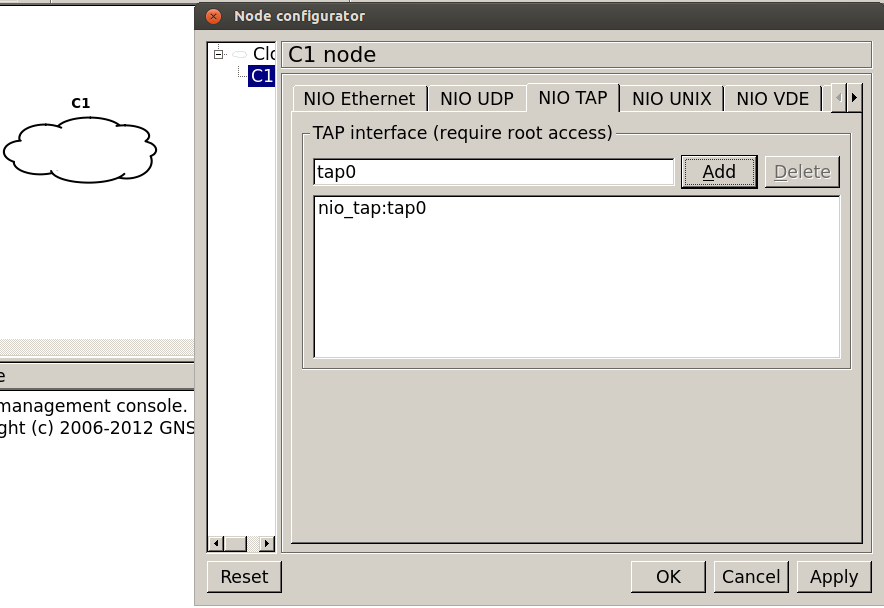
Open GNS3 as root user by using the “sudo” command. Add a cloud node to the topology, right-click it select configure navigate to the NIO TAP tab and in the textbox enter tap0, click add and click OK.
The cloud is now ready, add a router to the topology and connect it to the cloud, power on the router and configure its interface with an IP address in the same range as the IP assigned to the tap0 interface.
R1>enable
R1#configure terminal
Enter configuration commands, one per line.  End with CNTL/Z.
R1(config)#interface FastEthernet 1/0
R1(config-if)#ip address 10.200.200.2 255.255.255.252
R1(config-if)#no shutdown
Add a default route so that the router knows where to forward the internet traffic.
R1(config)#ip route 0.0.0.0 0.0.0.0 10.200.200.1
Try pinging a public IP address and you should get a reply. Pinging a domain name will fail as DNS is not yet configured.
Windows
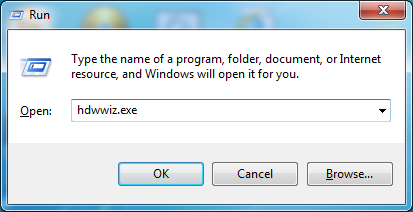
Moving on to Windows to do the same thing, the first task is to create a loopback interface. Open run and type hdwwiz.exe to open the “Add New Hardware Wizard”

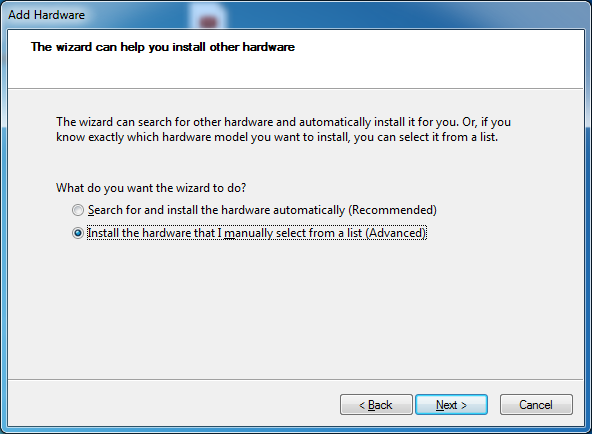
Select to add your hardware manually and click next.
Under common hardware types select Network Adapter and click next.
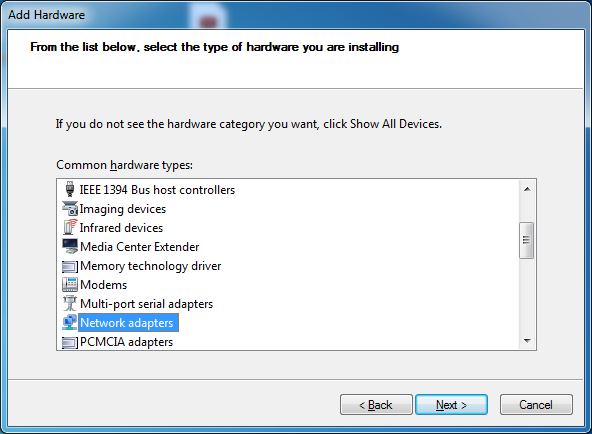
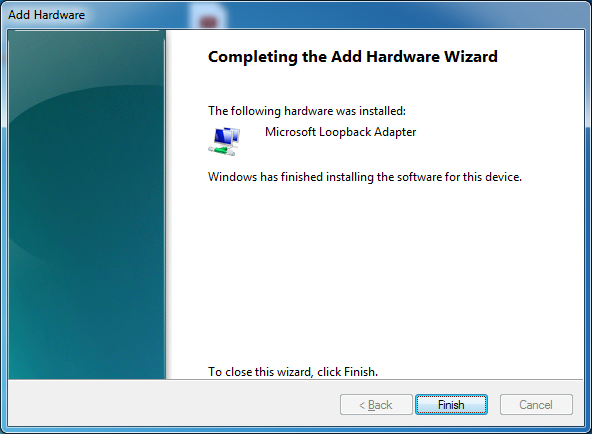
Under Manufacturer select Microsoft and under Network Adapter choose Microsoft Loopback Adapter and click next.

An IP address has to be assigned to the loopback interface now. Go to Start -> Control Panel -> Network and Internet -> Network Sharing Center, from the left pane click “Network Connections”, right-click your internet connection (it can be a WLAN connection, dialup connection, PPPoE connection etc) select properties and go to the sharing tab.
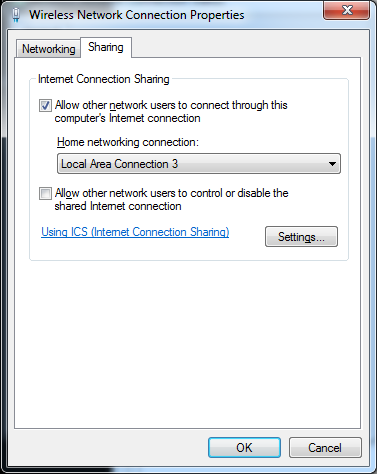
Select options as shown in the screenshot above, the “Local Area Connection 3” I have selected is the name of the newly created loopback interface which should be replaced by the name displayed in your system. Click OK twice, at this point your loopback interface will be assigned an IP address (192.168.37.1/24), it is your choice to use it or change it. In this article I will be changing it. Right-click the Loopback connection, select properties, select “Internet Protocol Version 4”, click properties and enter an IP address, subnet mask.

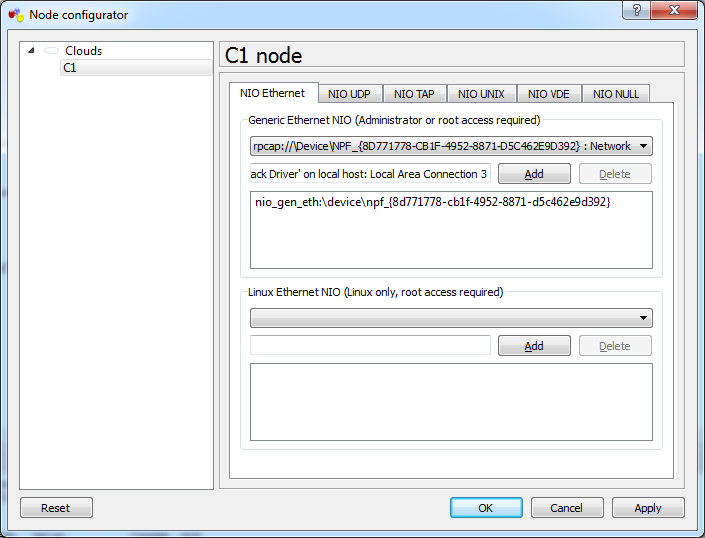
You may have to restart your computer for this loopback interface to show up in GNS3. Open GNS3 by right clicking it and choosing “Run as administrator”, insert a cloud node into the topology, right-click select configure
Add a router to the topology, connect one of its ethernet ports to the cloud and start the router. It is time to assign an IP address to this interface.
R1>enable
R1#configure terminal
Enter configuration commands, one per line.  End with CNTL/Z.
R1(config)#interface FastEthernet 1/0
R1(config-if)#ip address 10.255.255.2 255.255.255.252
R1(config-if)#no shutdown
Add a default route on this router.
R1(config)#ip route 0.0.0.0 0.0.0.0 10.255.255.1
Try pinging a public IP address and you should get a reply. Pinging domain names will result in an error as DNS has not yet been configured.
Configuring DNS on Cisco IOS
Now that routers in GNS3 are able to connect to the internet won’t it be nice if you could use friendly domain names instead of IP addresses. DNS can be configure in two easy commands given below.
R1(config)#ip domain-lookup
R1(config)#ip name-server 8.8.8.8 8.8.4.4
The first command enables domain lookup and the second command specifies DNS servers to use.
Configuring NAT for connecting to the internet
By now we have configured one GNS3 router to connect to the internet, if you connect more routers to this router connected to the cloud you will find that they are not able to communicate with the internet. This is because the physical machine does not know how to route the packets generated by the other routers of GNS3. The best solution for this is to perform Source NAT on the router connecting to the cloud. Take a look at the topology below which I will be using.

For R2 and R3 to connect to the internet we will be configuring NAT on R1 i.e. the router connected to the cloud.
R1(config)#access-list 10 permit any
R1(config)#ip nat inside source list 10 interface FastEthernet 1/0 overload
R1(config)#interface FastEthernet1/0
R1(config-if)#ip nat outside
R1(config)#interface FastEthernet0/0
R1(config-if)#ip nat inside
R1(config)#interface FastEthernet0/1
R1(config-if)#ip nat inside
The interface fastethernet 1/0 is the one c0nnected to the Cloud hence it is the outside NAT interface. The “overload” keyword is used as we are doing Port Address Translation. Both R2 and R3 must have default routes pointing to R1 else it will not work.


I can’t believe that there is a ton of sites out there where people claim this works without setting up NAT rules on router connected directly to cloud. Kudos for this tutorial. You are a true asset to the networking community.
Thanks dersini
You don’t have to set NAT if the device you’re connecting with your GNS3 cloud is from the same subnet as your physical router can give it an IP with DHCP.
As from the example above, you can see the virtual router (R1) didn’t need to set NAT for itself as it received DHCP from the physical router — since it’s connected in the same subnet.
You will need NAT if you are connecting devices from a different subnet, as your ISP won’t understand private IP addresses coming from your internal network unless they are translated first.
TL:DR: Same subnet, no NAT, just get IP from DHCP on your physical router. Different network, you need NAT.
if your internet router allows you to enter routes as well; don’t need NAT. just enter your networks which exist in your 3gns on the internet router pointing back to the internet facing device in your 3gns (cloud)
give me answer please
there should be 4 clouds with which minimum of 3 wireless pcs should be connected then serial ports of all the 4 clouds should be connected one router at the end with dns server and pc should be connected
Hi, this tutorial is really great, thanks!! Now, I have a problem, I can’t connect to a webpage via browser into the VM, you know why?
Hi Pablo,
Are you using a VM inside GNS3? What virtualization software is it (VMware or VirtualBox or something else)?
Are you able to ping public IP addresses from the VM? Try
Hi! yes, I can ping public addresses from the VM into VirtualBox, I installed Windows XP. The thing is I can’t load a page in FireFox (or IE) into the VM.
Thanks for the reply!
I hope you can help me!
It could be due to incorrect or missing DNS settings. Try pinging a domain name
If you get a
could not find host google.comerror change your preferred and alternate DNS IP addresses to 8.8.8.8 and 8.8.4.4But if you get replies we’ll see what else can be done.
Hello….
I did all things step by step which is mention here… but i cannot ping to public address.. what can be the peroblem?? Even i cannot ping to cloud..
Thanks
Hi sparta,
What internet connection are you using? Does your system directly get a public IP address or is a public IP assigned to your modem?
If possible can you take a screenshot of topology, upload it to imgur.com and share the link here.
Also upload the running configs of your GNS3 routers to pastebin.com and share the URL.
Hello Jesin,
Thanks for your kind support… I am having problem because of firewall…
My problem solved.
Thank you.
Hey Jesin, its a great article and it helped to connect gns3 to internet. one more thing i want to ask you, can we use wireshark for capturing packet activities in our gns3 topology. i am using 3G usb modem.
Thanks Sachin!
Yes you can definitely use wireshark. I don’t think your modem will be detected but in GNS3 you can right-click the link between the cloud and the router and choose Capture.
This opens wireshark, but traffic display isn’t automatically refreshed. You have to press F5 to see new traffic.
Gracias !!
nice blog jesin but i dont think there is any way to connect wifi adapter with cloud in gns3. after so many attempts i came to know that in gns3 your ether-net card’s mac need to have a physical connection with the router which is not in the case for wifi..
if you still have configured it without even connecting the pc with the router (with rj45) even once than please contact me.
waiting for your reply.
P.s: it feels really good to see this kind of information from someone from our own country. keep up brother. 🙂
Hello Uday,
There is a way to do this. Read from Scenario 2 > Windows (or Linux) in this article.
You’ll have to create a loopback adapter, connect the GNS3 cloud to it and enable ICS on the WiFi connection.
And thanks a lot for those words 🙂
This is exactly my situation. I like to connect GNS3 router to my wlan0 interface have my network out to internet.
I read your suggestion at Scenario 2.
What do you mean by “Replace wlan0 with the interface on the physical computer which connects to the internet it could be ppp0 or br0 or something else.”
My adsl router gateway is 192.168.1.1 and wlan0 is 192.168.1.50
In this case what should be the ip address for the tap0 and the ip address for the router interface that connects to the cloud plz?
Hi Krish,
That sentence means if you’re using something other than WiFi to connect to the internet (like data cards) you should replace “wlan0” with that interface.
But in your case since you’re using WiFi wlan0 is correct.
The IP of the tap0 and the router connecting to it can be anything other than the 192.168.1.0/24 subnet.
You can use the same ones mentioned in this article – 10.200.200.1 for tap0 and 10.200.200.2 for the router.
Hi Jesin,
That makes complete sense however I am not able to ping the internet. I posting the pics and config and hope you will be tell me where I am doing mistake. I have done this as root.
http://imgur.com/rjRwHpg,PtPID8T,9N4w4cG,5k1nQgt,twcOiSc
I am showing the following:
topology
ifconfig
route -n
iptables -t nat
router configuration
Please help.
Krish
Krish, please provide the output for the following commands too
Resolved it now. The mistake I did was under the cloud configure I was choosing NIO Ethernet instead of NIO TAP. It is working like a charm.
Thank you so much for your kind help.
Regards
Hello,
I followed your instructions and I am able to ping public address (4.2.2.2 / 8.8.8.8) from my gns3 router. when i connect a switch to the router, i am not able to ping out side my DG.
From the switch I can ping the wireless DG, but when I try to ping 4.2.2.2, it get time out. Same if add a PC to the switch I can ping up to the wireless DG. I have alll the default routes, NAT and settings correctly.
Anything else you can think of?
Hello Henry,
Which switch did you connect to the router? The generic GNS3 switch is not manageable so I guess it must be a router with the NM-16ESW module.
I think it would be a problem with the NAT configuration.
Copy your GNS3 router’s running config to http://pastebin.com and share the link here so that I can help you further.
jesin,
correct on the switch, it is a router with the module
router cfg is here http://pastebin.com/rfMVpgGP
The router configuration is fine the problem must be with the switch.
How did you configure IP addresses on it? Did you assign an IP to the VLAN interface or directly to a switching interface?
If possible also provide the config of the switch in the same way.
Jesin,
I assign the ip to interface VLAN.
I am doing the labs from CCNA for the Real World. The only difference is I am using wifi and in the video he is using a cable connection.
Topology
http://imgur.com/KAzS9US
Router CFG
http://pastebin.com/rfMVpgGP
Switch 1 CFG
http://pastebin.com/Bk1eHpwk
Switch 2 CFG
http://pastebin.com/gbaQU3F8
Henry,
I’ve replied to your comment via email, please check your inbox.
GNS3 network:
http://imgur.com/3siRFMb
Router configs are here:
http://pastebin.com/Nc3DR7qB
I can ping google.com from R2 but not from R1.
1. Can Ping 8.8.8.8 from R2
2. Can ping 10.200.200.1 from R1
3. Cannot ping 8.8.8.8 from R1
So it seems that it’s a Source NAT issue however I have followed your instruction ditto.
Can you please help again? Many thanks.
Krish
There is no default route on R1. Add the following
I missed this out in the article I’ll add it.
you are so right. It works like a charm now. Quick questions though:
How was R1 able to ping all the way to 10.200.200.2 (R2 f0/1) before? It did not need a default route. Why is that please?
Regards
That was because both routers had EIGRP configured. So R2’s EIGRP process would’ve advertised route 10.200.200.0/30 to R1.
You can confirm this with the
show ip routecommand on R1. You can also use EIGRP to advertise the default route from R2 to all routers connected to it.Enter into the router configuration mode and redistribute static routes.
This eliminates the need for creating a default route on each router.
Many thanks for clearing the doubts.
Regards
Hello there,
Thank you in advanced for your time.
I’m having a problem here, I can do this under Win but not under Ubuntu. I followed all your steps but the problem persist. I can’t ping my loopback adapter Tap0 from my router inside gns3. I opened Gns3 with the sudo command, I check fw and it’s totally turned off.
Kind of newbi to linux so i don’t know where else to check..
R1 f0/0 (10.1.1.1/24)——> cloud tap0 (10.1.1.2/24)
gns3 linux mint (ubuntu)
would appreciate any hint.
Thanks again.
Charlie.
Hi Charlie,
Open your topology, go to View menu > Show interface labels, take a screenshot, upload it to imgur.com.
Copy the running configuration of the router connected to the cloud and paste it in pastebin.com.
Share the links of both here.
Thank you budy! that helped me a lot on a cisco project! 🙂
Hi Bro, I thank you for your effort and clear explanation.
I have Linux Mint Installed on VMware and I installed GNS3. I tested and its running fine.
I need to know how to connect GNS3 with my other guest using cloud option.
example I have CUCM installed the on the vmware and I want to link with my GNS3.
I searched the net and couldn’t find any good steps
Thanks
Ahmed
Hi Ahmed,
So you have 2 VMs one with GNS3 on Linux Mint and another with CUCM.
Connect both the virtual machines using the Host-Only Networking mode and make sure they can ping each other.
Then set the GNS3 cloud to use Linux Mint’s network interface (eth0).
Hi Jesin,
Yes, both CUCM and Linux Mint are using Host Only option.
My problem was that when I try configure the Cloud and connect the Router, I was getting the following error message.
Error Msg: 206-unable to create Linux raw ethernet NIO
Error Msg: 206-unable to create Linux generic ethernet NIO
I am able to fix that problem, thanks to this URL: http://www.blindhog.net/voice-lab-running-gns3-as-root/
But now I am not able to Console the Routers. However, I think this solution {http://www.blindhog.net/voice-lab-running-gns3-as-root/ } will solve my problem. (I didn’t try yet) .
Again thanks so much
OOPs, sorry
Here is the URL about the “Problem: Can’t get console to open in GNS3”
http://rednectar.net/2012/03/08/problem-cant-get-console-to-open-in-gns3-workbench/
Thanks
Ahmed
I hope you solved the problem
hi
how to set ip public ( IP valid ) set on ASA Ethernet in GNS3 ???
Hi Milad,
What internet connection are you using? Cable, DSL, 3G etc.
Has your ISP assigned a static public IP for you?
Hi, this is a great guide. However when I run gns3 with the command sudo gns3 I don’t can add a virtual machine . I view the error “Virtual Box Machine Windows 7 seems to not exist, please check”. 🙁 How can do …?
Looks like your problem was solved here – http://forum.gns3.net/topic8330.html 🙂
Jesin,
I tried the 2nd solution and still console won’t open. So i decided to delete Linux Mint/GNS3 and start everything from start. Again i encountered same problem.
I used same resolution and after spending close to an hr of troubleshooting it worked like a charm :-).
BUT when I try to configure cloud, I can’t see/find my VMNet adapters.. All I see, is lo and Etho
I loaded five 3725 routers on my Linux MInt last night for testing and my cpu usage was between 3-17%, without setting up idle pc.
Thanks
Ahmed
I am able to solve my problem.
Go to VM>>settings and add additional Adapters:-)
I tested and its working for me..Now, I am ready to build my CCNP Voice lab
Thanks
Ahmed
muchas gracias por compartir tus conocimientos….
estaba volviendome loco sin salida a internet : )
Hi Jesin ,thanks for the turorial man!
I am wondering if you could help me out here.
My host is Ubuntu 12.04 LTS ,and i am connected to my router via wlan0 ,and my router has a public ip assigned by the ISP. My physical internal network is 192.168.1.0/24 and my host has 192.168.1.12. (Default gw is 192.168.1.1)
I have installed Ubuntu server 12.04 on vmware and installed GNS3 on it.
I want to create eventually 3 vmwares (all Ubuntu) and have them to be routed via GNS3 router in the vmware. But currently i can not ping 8.8.8.8 nor my real router 192.168.1.1 from the GNS3 router.
Let me tell you have i connected it ,and maybe you can tell me what i have done wrong :
In the GNS3 vmware ,i have added two network interfaces ,one is bridged (which receives an ip address from my real router 192.168.1.x) and the other is host only. So eventually i have in my vmware eth0 (host only with an ip 10.10.10.x/24) and eth1 (ip 192.168.1.x) .
I have created two tap interfaces tap0 and tap1 ,both with ip 0.0.0.0 and promisc mode. Bridged eth0+tap0 to interface BR0 ,and eth1+tap1 to interface BR1.
In the GNS3 ,my topology as follows :
Cloud1 (tap1)—>(fa1/0) R1 (fa1/1) —>(tap0) C0
C1 is connected via tap1 (supposed to be my physical network 192.168.1.x) to the router ,and C0 connected via tap0 (supposed to be my vmware 10.10.10.x network.
My fa1/0 have received an ip address via dhcp 192.168.1.x ,and i have set up an ip 10.10.10.254/24 on my fa1/1 .
My ip address on BR0 (vmware network) is 10.10.10.1/24 with default gw 10.10.10.254 ,and br1 receives its ip from dhcp 192.168.1.x .
I cant ping none of the router interaces from my host .I can ping both vmware network interfaces , but obviously because it bypases the gns3 router ,and vm’s have their own route between them.
Please help me getting my internet and connection to my physical network working from my cisco GNS3 router.
Hey man ,i have started from scratch following your instructions and it worked! THANKS!!!
Tell me please , are the commands “iptables -t nat -A POSTROUTING -o wlan0 -j MASQUERADE
iptables -A FORWARD -i tap0 -j ACCEPT” the same as setting up tap interface in promisc mode?
Just wanted to say thanks – this tutorial worked pretty much flawlessly on both my Windows and Linux lab machines. I wasted hours futzing with loopback drivers before I found your tutorial.
One tip: If you are on a Windows machine with many network interface entries — try expanding your “Cloud” configuration dialog so that you can see the full name of all the available interfaces. I was having a devil of a time figuring out which alias went with which until I realized I could simply expand that window. Seems silly, but it helped!
Thank you!!! I’ve been reading tons of articles trying to get my ASA in GNS3 to be able to traffic through my GNS3 router and then out the cloud attached to my loopback adapter on Windows 8. Once I added that nat statements to my router, my ASA could ping devices on my network, and on the internet. Thanks!
Thank you !!! followed this tutorial instructions and it worked like a charm.
I have a problem myself with Loopback adapter:
1. I have installed Loopback adapter in Win 8.1,
2. I’ve set up a Router and a cloud (loopback adapter) in GNS3
3. I’ve bridged my physical interface (Wi-Fi) with Loopback adapter
4. Gave my GNS3 Router IP address 192.168.1.171/24
5. My physical interface’s IP address is 192.168.1.4/24
6.Gateway IP: 192.168.1.1/24
Problem is that I can not ping from GNS3 Router to Host/Gateway or outside the network.
Neither can I ping from Host to GNS3 Routers interface (Destination Unreachable)..
Firewall is Off.
Please advise I really need to go on with my lab as I’m working on CCNA Security, Thanks in advance,
Unbridge the loopback and WiFi interfaces, go to the properties of the WiFi interface and share it with the loopback adapter.
Then assign IP addresses from the subnet 192.168.2.0/24 to the loopback interface and the router connecting to the cloud.
Thank you for your reply. I’ve tried that as provided but still can’t get out of my router. I can ping my loopback successfully but not my wi-fi or router. Sometimes the Success rate is 40 percent, sometimes is 0.
Hey Jesin, i am facing some issue with my topology while connecting to the network.
I am using windows 8,1 in my laptop, in a corporate network and i connect my laptop to my network via wifi. In GNS3 i am using c7200 image and router with only 1 fast ethernet port which i connect to my wifi card on the cloud. After following the setup i see that the router is receiving packets on it’s f0/0 port but is unable to ping any IP, even my laptop’s IP. Is there anything else which i need to do or need to provide more info to explain the issue? Thanks in advance.
Hey, i forgot to give some details. I had this problem before and after bridging my loop back adapter. Right now they both are bridged. And when i connect directly to my loop back adapter, i don’t receive any packets on my router’s f0/0 like i do when i make the connection to my wifi card. This is a fresh install and i have many virtual adapters in my system as well due to VMWare.
Thank you for this it is amazing, I never tend to post replies but you definitely deserve some praise for this. I have Ubuntu (i am a newbie – I know nothing of Linux as of yet) running in vmplayer on a win7 machine and these are the only instruction that I have found that actually work for LAN and Internet access for GNS3 on the Ubuntu virtual machine. Thanks!!!
Thanks alot Jesin, your article was really helpful. In my case i had to change the /proc/sys/net/ipv4/ip_forward file from 0 to 1 and then I was able to ping 4.2.2.2 Thanks again.
Hi, thanks for this article its really helped me.
I can successfully ping a public address on the internet (8.8.8.8 for example) from both the connected router and a remote router.
My topology is VM SW R1(can ping Loopback) R2(nat)(can ping loopback) MSLOOPBACK(Cloud)
However, I cannot ping the loopback address from my VCPS machine connected to R1. They just time out.
Any ideas why that could be?
Here is my topology
https://docs.google.com/file/d/0BxGpuVeasRJaYlhqM3lNRkE3RG8/edit
pings from VCPS
https://drive.google.com/file/d/0BxGpuVeasRJaSmhIUEo4d24wazA/edit?usp=sharing
you are awesome bro!!!!!!!!
worked great!!! i was trying to connect for hours, at last it worked thank you!!
Hi Jesin,
Thanks for the post, but I face issue still I fellow the steps for scenario 2 I’m using public Internet in Hostel like this Ip address 10.7.75.138 255.255.254.0 in wlan0 but I can’t access the internet from gns3, can you help please.
Thanks
Hi Ahmed,
Which OS are you using? Since you mentioned wlan0 I assume it is Linux. Did you create a tunnel interface? Are you able to ping from a GNS3 router to the tunnel interface?
Remember to open GNS3 as the root user or using sudo.
Hi Jesin,
Sorry for not mentioning it, I’m using Ubuntu 14.04, yes, I fellow the steps even I open GNS3 in gksudo as usual but I give Cloud Ip add 10.7.75.139 255.255.254.0 and my host wlan0 ip add 10.7.75.138 255.255.254.0
aslso I don’t understand this issue
“@reboot /usr/sbin/tunctl -t tap0 && /sbin/ifconfig tap0 10.200.200.1 netmask 255.255.255.252 up”
you use @reboot
Thanks
Aslo Brother, should I make the wlan0 and tap0 as IP address like 10.7.75.138 255.255.254.0 or different then comes to the router which IP address I must give to it?
Thanks
The IP you used for the tunnel is the problem, remember we are routing GNS3 over wlan0 which means each should have a IP from a different subnet. So better to use the IP in this article – 10.200.200.1
Then the GNS3 router which is connected to this tunnel interface should have 10.200.200.2
The @reboot means those commands are executed when the server reboots.
Hi Jesin,
now I give them the address like you mention tap0 10.200.200.1/30 and Router 10.200.200.2/30 the good thing I can ping my local host which wlan0 ip add 10.7.75.138 but I can’t ping 8.8.8.8 or any ip public ip?
Thanks
Hi Jesin,
I did what you mention giving the ip address 10.200.200.1 and 10.200.200.2 now i can ping my host mechine 10.40.106.192 but I can’t ping 8.8.8.8 any help.
Did you apply IPTables rules and enable IPv4 forwarding (/proc/sys/net/ipv4/ip_forward)?
Your hostel’s WiFi could be setting a low TTL value. From the Linux command line ping 8.8.8.8 and post the reply TTL values.
Thanks man Solved,
One more issue when i ever i restart the pc i have to echo 1 again to nat, is there another option which makes it default.
Thanks.
You’re welcome!
Edit
/etc/sysctl.conffind the following line:and remove the hash at the beginning. If this line isn’t present, add it.
it is very useful thank you i can ping any public addresses (yahoo.com, gmail.com, …….)
hi
i used gns3 v1.1
i have a problem with that
when i close my project i lose all configuration that i done
please help me
Hi Jesin,
I don’t know what happen, I can’t ping the public ip addresses previously yes but not anymore, anyhelp?
Thanks
It could be that iptables rules weren’t applied when rebooted. Follow these instructions to save them.
Great Sir, You are ultimate, wonderful. . .
thank you lot for this Information . IT is really works.
sir, im using sun broadband modem. the one with sim card in it. how could i connect my GNS to the internet?
If your system receives a public IP address directly follow Scenario 2, check using
ipconfigorifconfig.Hi, Justin!
First, thank you for this post.
Will this example work if we do not put this access list? Can we only put some routing protocol, for example RIP and on this router which is conected with cloud do redistribute static?
My second question, can we do ping direct from router from GNS3 to some onother device, but without using Ethernet port. In this case, all trafic go over wlan0, but base is the same. Can we connect that without wlan or eth?
Thanks in advance.
great tutorial but im having this problem
please take a look at my pings:
R1#ping http://www.google.com
Translating “www.google.com”…domain server (8.8.8.8) [OK]
Type escape sequence to abort.
Sending 5, 100-byte ICMP Echos to 173.194.115.208, timeout is 2 seconds:
.!.!.
Success rate is 40 percent (2/5), round-trip min/avg/max = 76/78/80 ms
R1#ping http://www.google.com
Type escape sequence to abort.
Sending 5, 100-byte ICMP Echos to 173.194.115.208, timeout is 2 seconds:
!.!.!
Success rate is 60 percent (3/5), round-trip min/avg/max = 76/85/104 ms
R1#ping http://www.google.com
Type escape sequence to abort.
Sending 5, 100-byte ICMP Echos to 173.194.115.208, timeout is 2 seconds:
.!.!.
Success rate is 40 percent (2/5), round-trip min/avg/max = 72/78/84 ms
R1#ping http://www.google.com
Type escape sequence to abort.
Sending 5, 100-byte ICMP Echos to 173.194.115.208, timeout is 2 seconds:
!.!.!
Success rate is 60 percent (3/5), round-trip min/avg/max = 72/85/96 ms
as you can see im losing packets, i know the first one almost everytim is lost because of arp, but to lose more than one always is a problem.
can you help me???
Simple and amazing tutorial … more than enough to make my lab work like charm :D,
i think u should add how to propagate 0.0.0.0 with eigrp in the tutorial i saw it in the comments but it’s important to include it in the tutorial .
Thanks
Hi Jesin.
I have a really annoying problem with my GNS3 Lab. I hope u could help me.
I am practicing IPV6.
My lab is behind Fortigate firewall.
I configured the fortigate to tunnel the IPV6 traffic to Hurricane Electric Servers, to provide me IPV6 browsing.
everything works. i am able to ping the IPV6 public address`s from my physical pc and the first CISCO router (named router4) that connected to the cloud in GNS3 (this cloud is connected to my physical Nic) also can ping the public IPV6 address. the problem is the other routers that connected behind router4 – they cant even reach the internal network only router4 interfaces.
my fortigate internal interface IPV6 is – 2001:470:1f15:e7d::1/64 (default gateway) IPV4 192.168.2.253 (default gateway)
my physical pc nic is – 2001:470:1f15:e7d::2/64 (also have ipv4 192.168.2.65)
Router4 in GNS f0/0 – 2001:470:1f15:e7d::3/64
Router4 in GNS f0/1 – 2001:470:C41C::1/64
Router2 in GNS f1/0 – 2001:470:C41C::2/64
ipv6 unicast-routing is enabled + ipv6 routes to all networks are configured inside gns3
on router4 both intefaces has ipv6 nat enabled
No ipv4 address are configured in gns3.
as u post a solution for that but in the IPV4 environment. i tried to find a solution for IPv6 Nat but with no luck.
mey be u can help me with that?
Thank you so much, Jesin!
I was busting my head trying to follow instructions on how to do this from some GNS3 community blogs. I was heading down a path of major system changes (install uml-utilities, add groups, change my iptables rules, etc.), headaches, and no progress whatsoever.
Then I stumbled upon your method, tried it, and was dumbfounded on how easy and effortless the solution was. Oh man! You’re a life saver!
I’ve followed the tutorial till the very end, but when I tried to ping http://www.google.com this is what I was getting
R1#ping http://www.google.com
Translating “www.google.com”…domain server (192.168.1.1)
% Unrecognized host or address, or protocol not running.
Any help would be much appreciated , just email it to me or simple reply to my comment!
Thank you!
Did you configure DNS using the
ip name-servercommand?Can you ping to a public IP like 8.8.8.8?
Hi My Friend,
Thank you for the great effort you exerted here.
Hi,
Thank you for this tutorial, this really helps.
Best Regards,
Lemuel
Hi Jesin A,
This Tutorial was awesome, Thank you very much.
I have one doubt:
-> I have Airtel Dongle to Connect to my internet.
PPP adapter airtel:
Connection-specific DNS Suffix . :
IP Address. . . . . . . . . . . . : 223.236.26.109
Subnet Mask . . . . . . . . . . . : 255.255.255.255
Default Gateway . . . . . . . . . : 223.236.26.109
As per above tutorial i have executed and got the ping response from internet.
This is the IP and Gateway configured while i connect my dongle.
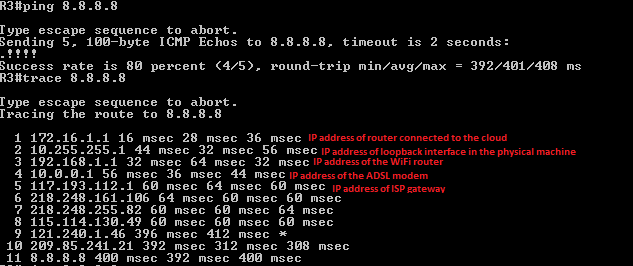
But if i give trace 8.8.8.8,
Gateway#trace 8.8.8.8
Type escape sequence to abort.
Tracing the route to google-public-dns-a.google.com (8.8.8.8)
1 10.255.255.1 64 msec 28 msec 32 msec
2 * * *
3 10.206.130.253 332 msec 216 msec 188 msec
4 10.206.131.194 244 msec 272 msec 1188 msec
5 125.17.180.209 228 msec 252 msec 196 msec
6 182.79.234.225 296 msec
182.79.236.106 212 msec
182.79.243.18 204 msec
7 72.14.242.178 196 msec 212 msec 220 msec
8 72.14.236.77 220 msec 180 msec 220 msec
9 209.85.240.159 188 msec
209.85.240.139 188 msec 200 msec
10 google-public-dns-a.google.com (8.8.8.8) 224 msec 228 msec 252 msec
in this output,
can i have the answer for my following,
1. IP Address of Wifi Router
2. Ip Address of ADSL Modem
3. IP Address of ISP Gateway
Thanks in Advance
Hi Mohan,
Since your Airtel dongle is directly connected to the computer there is no WiFi router or ADSL modem.
There is no definitive answer as to what is the IP address of your ISP gateway. Mobile internet uses a point-to-point connection which is why your IP address and gateway are the same.
Hi Jesin,
Thanks for you reply,
If my Gateway is as defined fixed as it is following pt to pt conn., then the packets has to route via gateway only know. Why in the Trace Route i couldnt able to see my gateway? Plz Clarfiy !!
Gateway#trace 8.8.8.8
Type escape sequence to abort.
Tracing the route to google-public-dns-a.google.com (8.8.8.8)
1 10.255.255.1 64 msec 28 msec 32 msec
2 * * *
3 10.206.130.253 332 msec 216 msec 188 msec
4 10.206.131.194 244 msec 272 msec 1188 msec
5 125.17.180.209 228 msec 252 msec 196 msec
Thanks in Advance
Hi Jesin,
Thank you very much for this great tutorial, after follow your tutorial I can connect my virtual network GNS3 to internet
This my network topology : http://imgur.com/a/uVdvq
Ping Yahoo from R1 :
R2>ping http://www.yahoo.com
Translating “www.yahoo.com”…domain server (8.8.8.8) [OK]
Type escape sequence to abort.
Sending 5, 100-byte ICMP Echos to 106.10.138.240, timeout is 2 seconds:
!!!!!
Success rate is 100 percent (5/5), round-trip min/avg/max = 56/68/76 ms
But can not connect to internet if using domain name in solaris for R2 and mint and Win for R1
just can connect using IP address.
Thank you.
Hi Herman,
Maybe the DNS settings on those PCs are incorrect. From the command line of win7-1 try
nslookup www.yahoo.com 8.8.8.8.Nice work, man!!!
Brandon from Taiwan~
Hello,
I can ping public addresses (8.8.8.8 and google.com) from the VM into VirtualBox but I can’t load a page in Chrome (or IE) into the VM.
Thanks for the reply!
I hope you can help me!
Hi.
Thanks for the great tutorial!
I can now ping the outside world from within my GNS3 emulated network. And replies to the packets originating from within my emulated network reach the hosts fine (so I can even browse the web from a VM Host in my emulation).
What would I have to do in order to be able to reach my emulated devices directly over the internet (really it is only one specific IP X which needs to access the emulated NW)? I mean I need to reach the emulated NW devices from a certain server running a NMS=Network management system (the server running GNS3 and the server running NMS can ping each other no problem).
I assume I need eithersomething like a static route on the machine which has tap0 configured (my GNS3 server) or I need to set some iptables rule to forward traffic originating from address X (NMS server) and going to eth0 to be forwarded to tap0!?
If you can please give me some advice on this. Thank you!!!
I get error => Server error from http://127.0.0.1:3080: R1: unable to create generic ethernet NIO
I have created the loopback interface but could not connect a router to it. Can you suggest a solution.
I am using gns version GNS3 version 1.5.2 on Windows (64-bit) with Python 3.5.1 Qt 5.6.0.
Thanks.
Hi Guys I was using GNS3, Installed on Win10 & Win 7 on VMWARE ESXI 6.0. I just could not get external connectivity. I tried 32-bit and 64 bit WIndows OS and etc. I spent 3 weeks, the problem I was facing was I was getting DHCP IP address assigned at interface level if I did “ip address dhcp” but I was not able to ping the host, the gateway or the external network. The Solution was on the VSwitch, I had to change promiscuous mode to Accept from Reject. I hope this saves someone else 30+ hours. Jesen Great job, I think you have great Linux posts as well; you #1 for Google results for connecting “GNS3 to external network”
hello can I connect the internet using ipv6 ?
my cloud is ipv4 and I want to connect a pc with ipv6 to it how can I do that in gns3 ?
Awesome blog , covered all scenerio … the best blog on this topic on internet.
hi Jesin
please can you help me.
i posted my issue here, https://www.gns3.com/qa/im-unable-to-browse-to-the-inter
i cant get to the net by name from the PC behind the router.
all the details in the link
regards
Hi Jesin,
This is a very helpful document. May I know which version of GNS3 you are using ? I am using GNS3 of version 2.1.9, and when I to config the “CLOUD” node, the UI looks quite different.
Thanks,
Jack