Jesin's Blog

Welcome to the Portal of Technology

  • Facebook
  • GitHub
  • RSS
  • Twitter
  • Home
  • Categories
    • Domains
    • Linux
    • Networking
    • PHP
    • Virtualization
    • Web Design
    • Web Servers
    • Windows
  • WordPress Plugins
    • Custom Error Pages
    • HTTP Digest Authentication
    • Mailgun Email Validator
  • Toolbox
    • DNS Lookup Tool
    • htdigest Generator Tool Online
    • htpasswd Generator Tool Online
    • HTTP Headers Lookup Tool
    • MD5 Encryption Tool
    • Open Port Check Tool
    • SHA-1 Encryption Tool
    • URL Encoding/Decoding Tool
  • About Me
  • Contact Me
  • Sitemap
Home ›
Windows ›
How to install Windows XP after Windows Vista/7

How to install Windows XP after Windows Vista/7

August 13, 2011 Windows Jesin A Leave a Comment

windows category thumbnail

This article aims at solving a problem faced by most computer users when trying to setup a dual boot by installing an Operating System older than the currently installed OS. When you install Windows XP after installing Windows Vista or 7 the latter’s boot menu disappears and your PC directly boots into Windows XP. But solving the problem is just a simple matter of executing a few commands.

Step 1: Install Windows XP

So you have a PC with Windows Vista or 7 and want to install Windows XP, don’t worry about anything now just go ahead and install it. Just remember to install it on a partition that DOES NOT have Windows Vista/7 installed. After installation is over you’ll find that there is no option to boot into Windows Vista/7. Don’t panic just follow the remaining steps

Step 2: Reviving the Windowx Vista or 7 boot menu

Boot your computer using the Windows Vista or 7 DVD, select the language and click “Repair your Computer” option. After it scans for your windows installation select the OS and click next. Open “Command Prompt” and type the following commands

bootrec /fixmbr
bootrec /fixboot
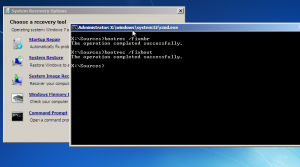
Windows 7 repair mode
Execute the commnds in the repair mode command line

Now we’re back to the Windows Vista/7 boot menu but what happened to Windows XP ??? It has disappeared now 🙁 No problem we’ll add a boot entry for Windows XP in the boot menu

Step 3: Adding Windows XP to the boot menu

After Windows Vista/7 loads you’ll have to open a command line with administrative privileges. For this go to Start menu -> All Programs -> Accessories -> right-click command prompt select “Run as administrator”. Type bcdedit and note the partition of {bootmgr}
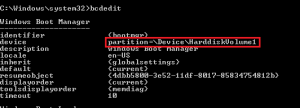
Bootmgr partition
Note down the partition of {bootmgr}

Now execute the following commands to add a Windows XP boot entry

bcdedit /create {ntldr} /d "Windows XP"
bcdedit /set {ntldr} device partition=\Device\HarddiskVolume1
bcdedit /set {ntldr} path \ntldr
bcdedit /displayorder {ntldr} /addlast

The “partition” specified in the second command is the partition of {bootmgr}. Don’t ever make a mistake while entering this command if you do this boot entry won’t work. After this is done restart your computer and enjoy the results. If you have any problems ask away using the comment form.
Related posts:

windows category thumbnailCreate a bootable Windows Vista/7 Installation Pen Drive windows category thumbnailWindows devmgr_show_nonpresent_devices windows category thumbnailDig command on Windows OS virtualization category thumbnailHow to install a Guest OS in VirtualBox windows category thumbnailChange Registered To in Windows

Leave a Reply Cancel reply

Your email address will not be published. Required fields are marked *

Get a wealth of information delivered to your inbox. Subscribe and never miss a single article.

  • Tutorials and howtos
  • Code, scripts and commands
  • Online Tools

* No spam, unsubscribe anytime

Hire Me

  • SSL installation and hardening (A+ on Qualys SSL test)
  • Apache & Nginx configuration
  • Email deliverability improvement (10/10 on Mail Tester & MailGenius)
  • WordPress customization, optimization and migration
  • and much more…

    Tools

    • DNS Lookup Tool
    • htdigest Generator Tool Online
    • htpasswd Generator Tool Online
    • HTTP Headers Lookup Tool
    • MD5 Encryption Tool
    • Open Port Check Tool
    • SHA-1 Encryption Tool
    • URL Encoding/Decoding Tool

    Nav

    • Home
    • About Me
    • Contact Me
    • Privacy Policy
    • Sitemap
    Vultr SSD VPS

    Creative Commons License
    Jesin's Blog by Jesin A is licensed under a Creative Commons Attribution-NonCommercial-ShareAlike 4.0 International License.
    Based on a work at websistent.com.