
The SSH protocol has a unique feature of tunneling other protocols and encrypting them. This article will show you how to use the popular terminal emulator PuTTY to create a SSH tunnel to pass VNC traffic which is normally unencrypted. This is just an example of tunneling VNC traffic through PuTTY you can tunnel almost any traffic (eg HTTP, FTP) by changing port numbers. First I will show you how this is done through the GUI and then by using command line parameters of PuTTY which are very similar to the “ssh” command in Linux. This article assumes that a VNC server software has already been installed on the target Linux computer and a VNC session has been created.
Creating a SSH Tunnel using PuTTY – GUI
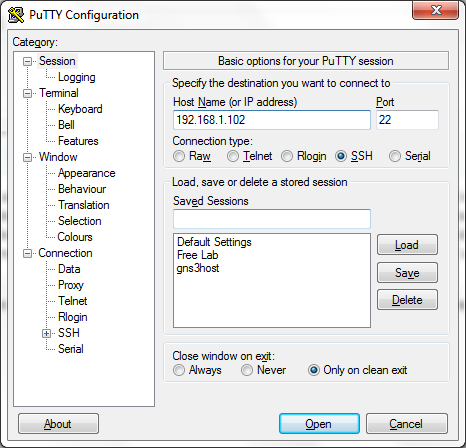
Open PuTTY and enter the IP address/Hostname of the Linux server. Leave the port number to 22 if you did not change the default SSH port number on the Linux Server.
From the Category section expand “SSH” and select “Tunnels”, enter both the source port as 5901 (any port number will do) and destination as <ip address>:5901 eg. 192.168.1.102:5901. I have configured a VNC session on my Linux server with the following command.
vncserver :1 -geometry 1366x768 -depth 24
Hence I will be using port 5901 as the destination. The source port can be any number, I am entering the same number just to avoid confusion.
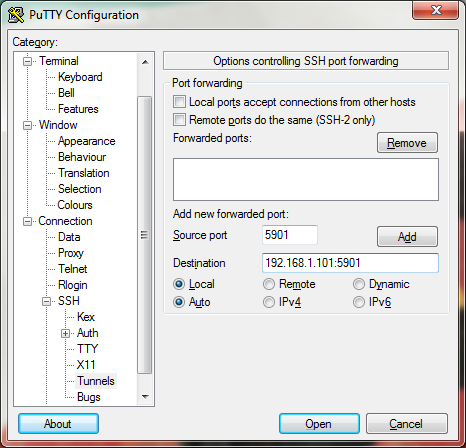
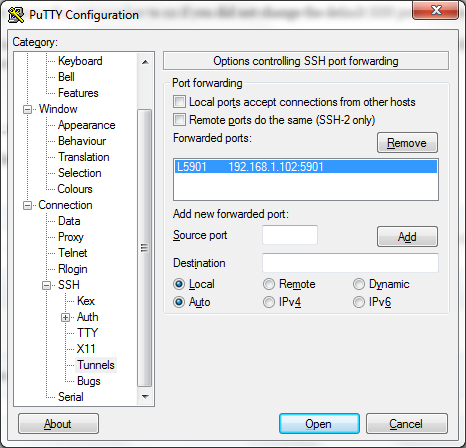
Leave all the other radio buttons to their defaults and click the Add button. You will now see the setting under “Forwarded Ports”.
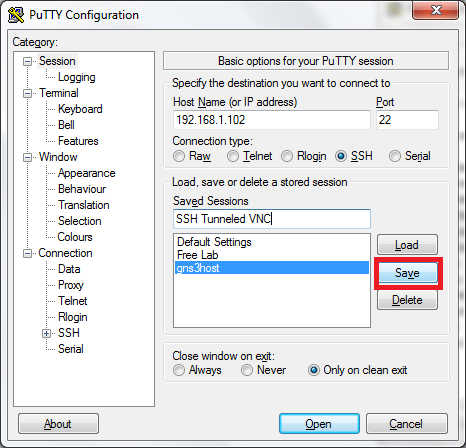
Come back to the “Session” page to save these settings as a session so that you do not need to enter them each time. Under “Saved Sessions” specify a name and click the save button.
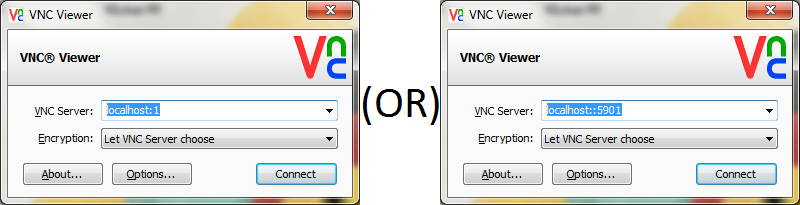
Thats it now click open, enter your credentials. Once logged in minimize the PuTTY window and open your VNC viewer software and enter “localhost:5901” replace 5901 with the port number you entered in the SOURCE PORT field of PuTTY under SSH -> Tunnels.
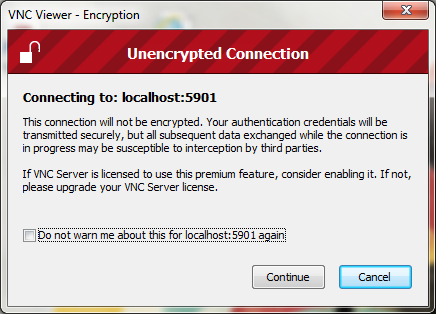
OMG what is this ? Connection is unencrypted ? But didn’t you follow this whole thing to tunnel your VNC connection over SSH using PuTTY. Worry not my friend this is normal because neither your VNC client software nor your VNC server knows that your traffic is being encrypted because all tunneling and encryption starts AFTER the data leaves the VNC Viewer software and ends BEFORE it hits the VNC server daemon running on your Linux server. That is why you entered “localhost” in the VNC viewer instead of the actual IP address of the Linux machine. So safely click continue, enter your VNC credentials and start using your encrypted VNC connection.
Still not satisfied with my answer let me show you solid proof that the connection is indeed encrypted. First up the following are the IPTables firewall rules present in my Linux machine.
iptables -A INPUT -m state --state RELATED,ESTABLISHED -j ACCEPT

iptables -A INPUT -m state --state NEW -p tcp --dport 22 -j ACCEPT

iptables -A INPUT -p icmp -j ACCEPT

iptables -A INPUT -i lo -j ACCEPT

iptables -A INPUT -j REJECT
Other than RELATED and ESTABLISHED connections the rules allow only SSH, ICMP and Loopback interface traffic even then I was able to use VNC on port 5901. You can also try these firewall rules. Here is how tunneling works.
After PuTTY is configured and a SSH connection established/authenticated, PuTTY will start listening on port 5901 (or the source port you had mentioned in PuTTY) this can be confirmed using the netstat -aon command from the Windows command line.
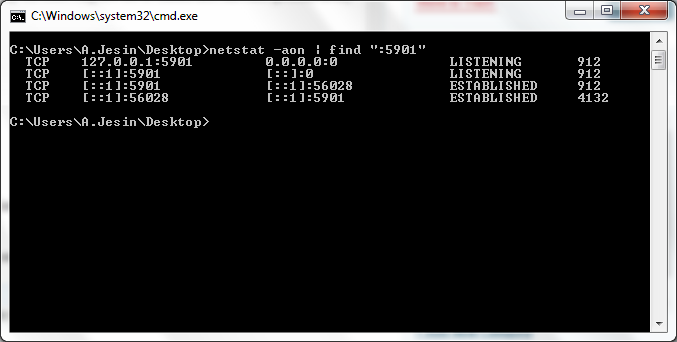
The last column shows Process IDs 912 is PuTTY and 4132 is VNC Viewer. When you enter “localhost:5901” in the VNC Viewer and click connect the following process happens.
- The VNC Viewer initiates a connection on port 5901 localhost.
- The PuTTY software listening on the port answers this connection.
- PuTTY then transfers all the VNC data through the SSH connection initiated from the client to the server.
- The SSH daemon running on the target Linux machine forwards this data to the IP address and port number entered in the “Destination field” field of PuTTY.
- This traffic passes through the loopback interface (it is matched by rule number 4 from the firewall rules mentioned above) and is answered by the VNC Server daemon.
You can use the following tcpdump command to see the movement of traffic.
tcpdump -i lo port 5901
All packets will contain the same IP address in both the source and destination field and that is the IP address of the VNC server. Try running the tcpdump command with the same filter but a different interface like eth0 you will not get a single packet!!!
Creating a SSH Tunnel using PuTTY – Command-line
Now lets do the same thing through the command-line. It’s very simpla all you have to do is go to Run -> cmd navigate to the place where putty.exe is located and enter the following.
C:\Users\A.Jesin\Desktop>putty.exe -ssh jesin@192.168.1.102 -L 5901:192.168.1.102:5901
The syntax is as follows
putty.exe -ssh <user>@<linux-server-ip> -L <local port>:<linux-server-ip>:<remote vnc port>
Optionally you can add a “-N” in the end of the command which is similar to the “Don’t start a shell or command at all” option available in the GUI of PuTTY under Connection -> SSH. If you use this option you create a SSH tunnel by logging in as a user who has “nologin” shell.


[…] of your choice as a non-root user you’ll get a “permission denied” error. Using PuTTY on Ubuntu I got the following error – “Unable to open connection to: Unable to open […]